Android Product Flavours with Jenkins Job

Hi guys, this blog is for having product flavours in one single Jenkins job.
Instead of having multiple jobs (dev, staging and prod environment) for same project, we can have it one job.

We can use jenkins global properties for giving choice while selecting parameters values. But we are using values from our own workspace, due to following reasons:
1) We don’t want to be dependent on Jenkins Global properties or any other guy to maintain properties in jenkins for our job.
2) It can be changed from our own code base only.
3) We can have multiple combinations of same parameter (using build variants).

So that it becomes easier to maintain.
Also we will be able to perform different actions for same job.
For example,
1) We want to upload Prod-Release flavour APK at your repository and don’t want to for other build types.
2) We want to sign apk only for Prod-Release builds and not for other type of builds.
3) We want to assign different values for same keys/parameters (same like build variants)

There are many blogs where we can read about Android Project Integration with Jenkins.
But I was not able to find a blog which is having implementation of Jenkins with Android product flavours.
And somehow I was able to make it up using Jenkins Plugins only, so would like to share it.

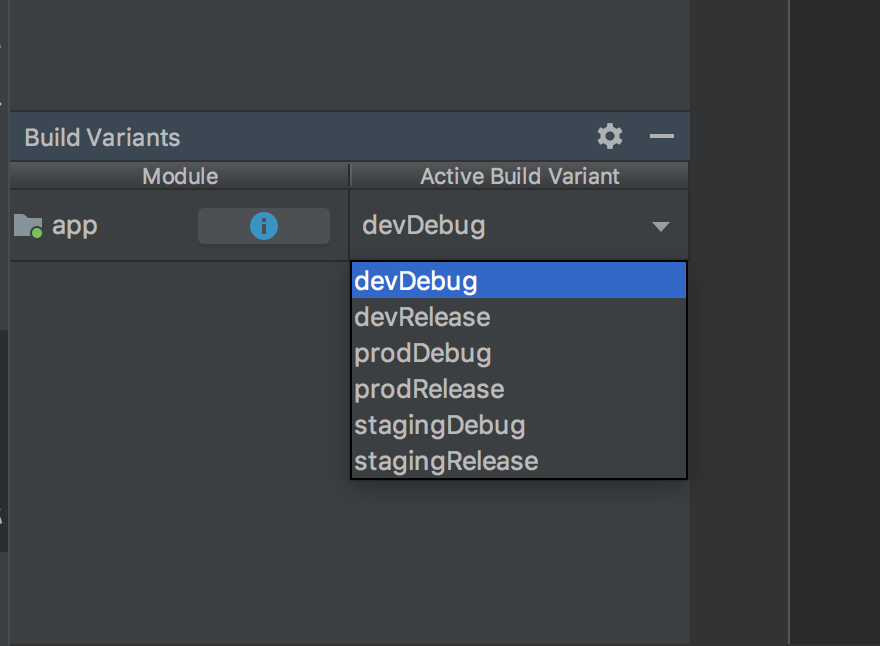
Starting with product flavours in Android project. 
We are having three flavours:

I) Dev (This is for internal development environment).

II) Staging (This is a exact copy of PROD env, its used for testing before releasing).

III) Prod (This is real time env)

And we have implemented for getting values from Jenkins and update or override if needed, using groovy script in gradle.

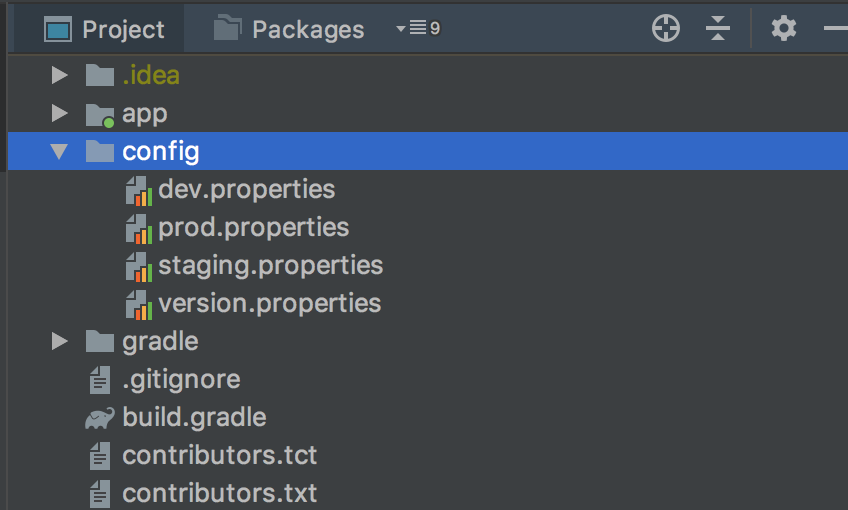
The following image is for different properties files based on type of config:

To read the values from different properties file based on build variant we choose to build the apk, we have to specify code in build.gradle (root) :


import java.util.regex.Matcher
import java.util.regex.Pattern

// Top-level build file where you can add configuration options common to all sub-projects/modules.

buildscript {
    repositories {
        jcenter()
        maven {
            url 'https://maven.google.com/'
            name 'Google'
        }
        google()
    }
    dependencies {
        classpath 'com.android.tools.build:gradle:3.5.3'
        classpath 'com.google.gms:google-services:4.3.4'
        classpath 'com.google.firebase:firebase-crashlytics-gradle:2.3.0'
        // NOTE: Do not place your application dependencies here; they belong
        // in the individual module build.gradle files
    }
}

allprojects {
    repositories {
        google()
        jcenter()
        maven {
            url "https://maven.google.com"
        }
        maven {
            url 'https://maven.google.com/'
            name 'Google'
        }
        
        maven { url "https://jitpack.io" }
    }
}

ext {
    // Get the current flavor of the build Ex: dev, stg, prod

   //If build is made from jenkins
    if (project.hasProperty('CONFIG_TYPE')) {
        flavor = project.property('CONFIG_TYPE')
        def pattern = Pattern.compile("([A-Za-z]+)(Release|Debug)")
        def buildVariant = ""

        Matcher matcher = pattern.matcher(flavor)
        if (matcher.find()) {
            buildVariant = matcher.group(1).toLowerCase()
        }

        // Read the .properties for config
        config = getProps('config/' + buildVariant + '.properties')

        if (project.hasProperty('BASE_URL')) {
            config.setProperty('BASE_URL', project.property('BASE_URL'))
        }
        if (project.hasProperty('BASE_PORT')) {
            config.setProperty('BASE_PORT', project.property('BASE_PORT'))
        }

    } else {
      //If build is executed from local or Android Studio
        flavor = getCurrentFlavor()
        if (flavor.isEmpty()) {
            flavor = "dev"
        }

        // Read the .properties for config
        config = getProps('config/' + flavor + '.properties')
    }

}

def getProps(path) {
    Properties props = new Properties()
    props.load(new FileInputStream(file(path)))
    return props
}

def getCurrentFlavor() {
    Gradle gradle = getGradle()

    // match optional modules followed by the task
    // [a-z]+([A-Za-z]+) will capture the flavor part of the task name onward (e.g., assembleDevRelease --> Dev)
    def pattern = Pattern.compile("([A-Z][A-Za-z]+)(Release|Debug)")
    def flavor = ""

    gradle.getStartParameter().getTaskNames().any { name ->
        Matcher matcher = pattern.matcher(name)
        if (matcher.find()) {
            flavor = matcher.group(1).toLowerCase()
            return true
        }
    }

    return flavor
}

We are first checking whether the property exists or not project.hasProperty(‘CONFIG_TYPE’). This property we are setting from jenkins choice parameter plugin. And then reading each and every property from jenkins only.

And if we are just executing build in local, then it will take first that current flavour and then will read all properties from selected build variant type.

Now to assign properties which used in app, use this following code in build.gradle (app-level) inside android block:

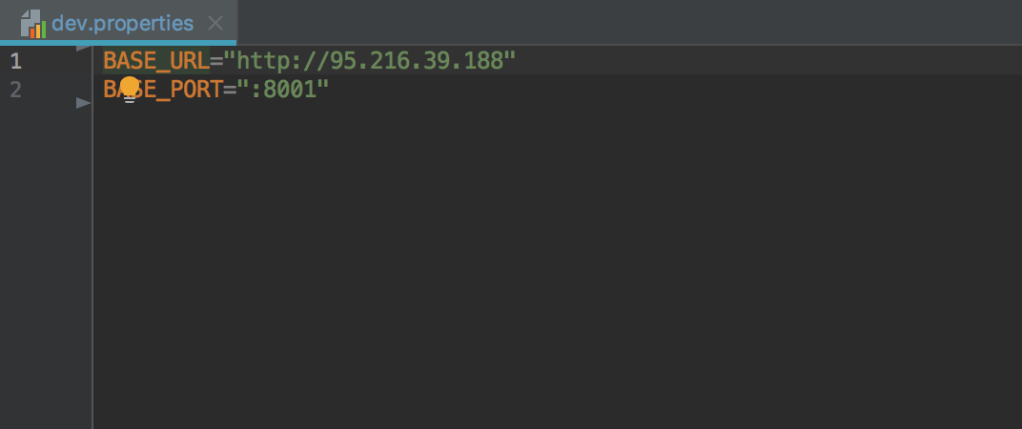
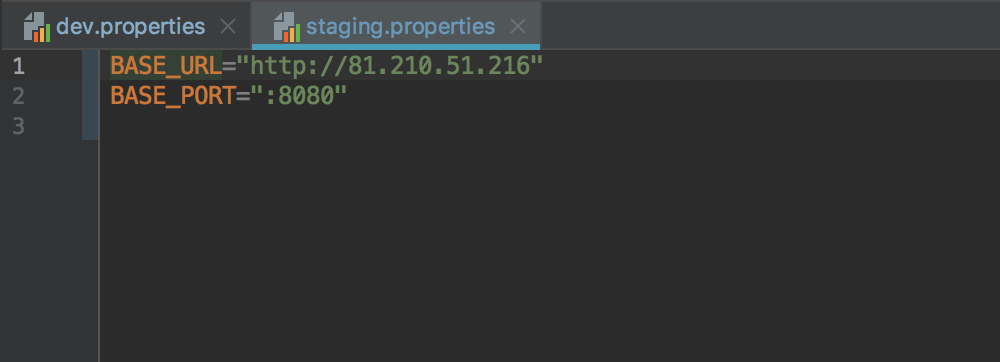
In different properties file, we have assigned different values for keys:

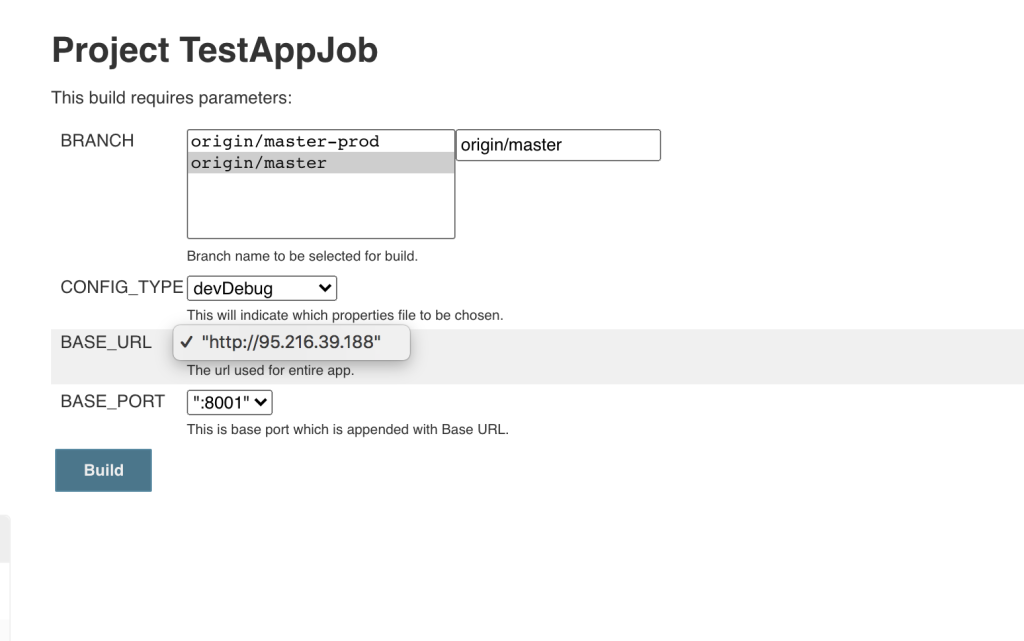
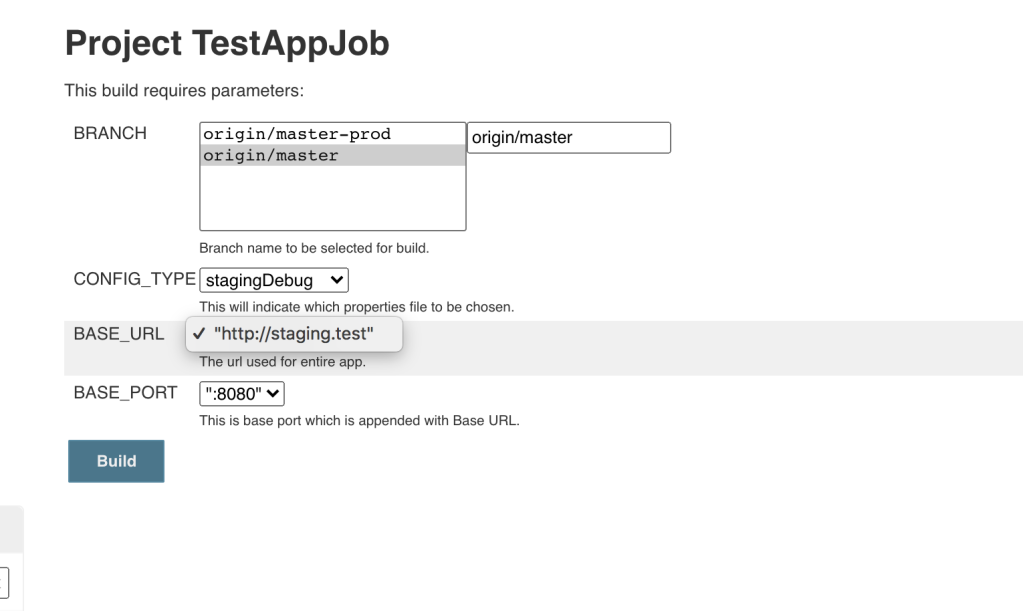
Now lets jump in Jenkins with our job.

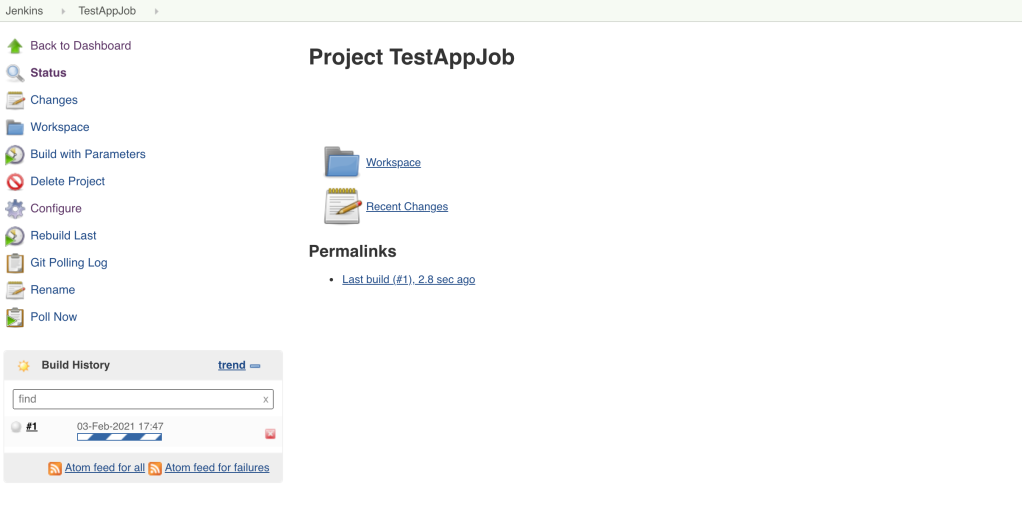
Selecting different config will show different values and it will read from properties file we have in our workspace.

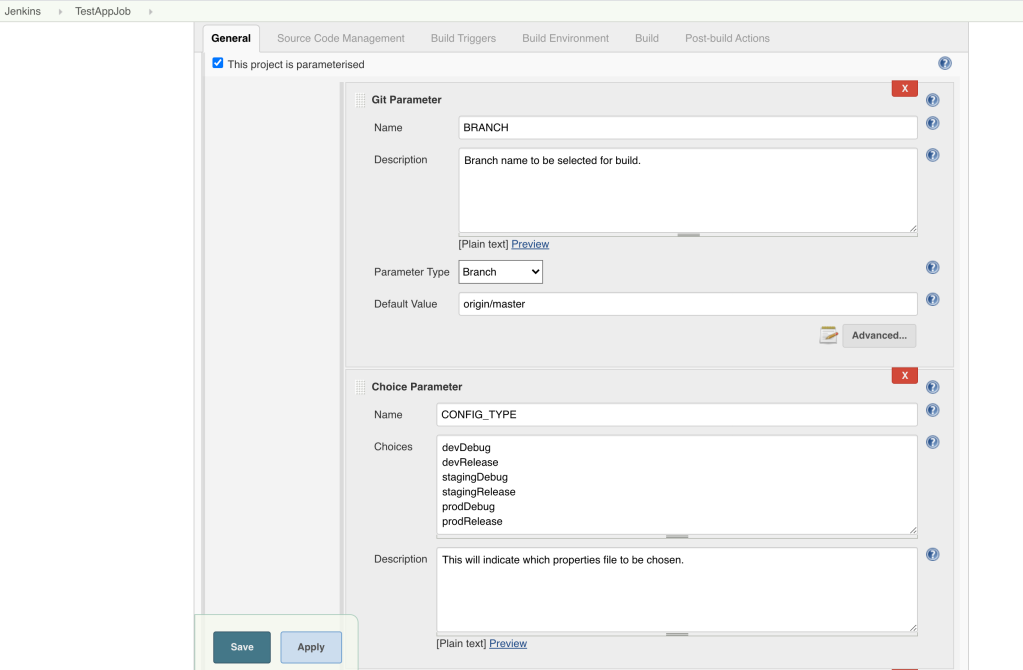
Now lets move to configuration part.

First we are setting Branch selection in Git Parameter and Config-Type is taken in Choice Parameter plugin. Config-Type is build variant what we have in our project but we have statically mentioned its choices.

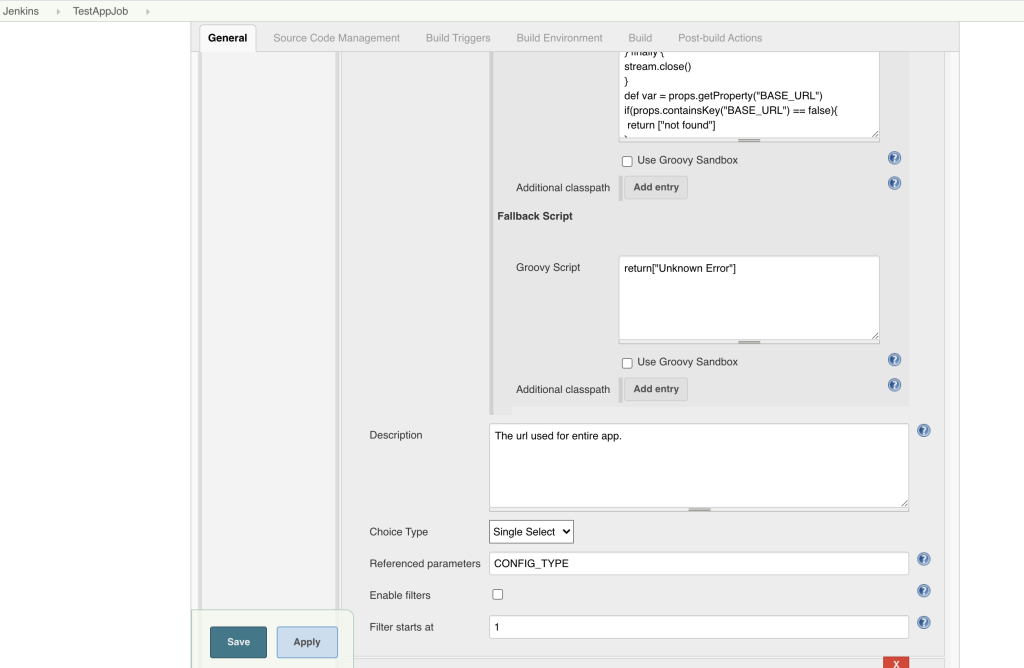
Then we are showing for Base URL based on Config-Type selected. In this we are using groovy script to fetch values. We have taken this as Active Choice Reactive Parameter as we are taking reference parameter as Config-Type.

(Please Note: We have to uncheck “Use Groovy Sandbox” Option and should be having admin access for writing the groovy script else we have to request for approval of script then only it will execute)

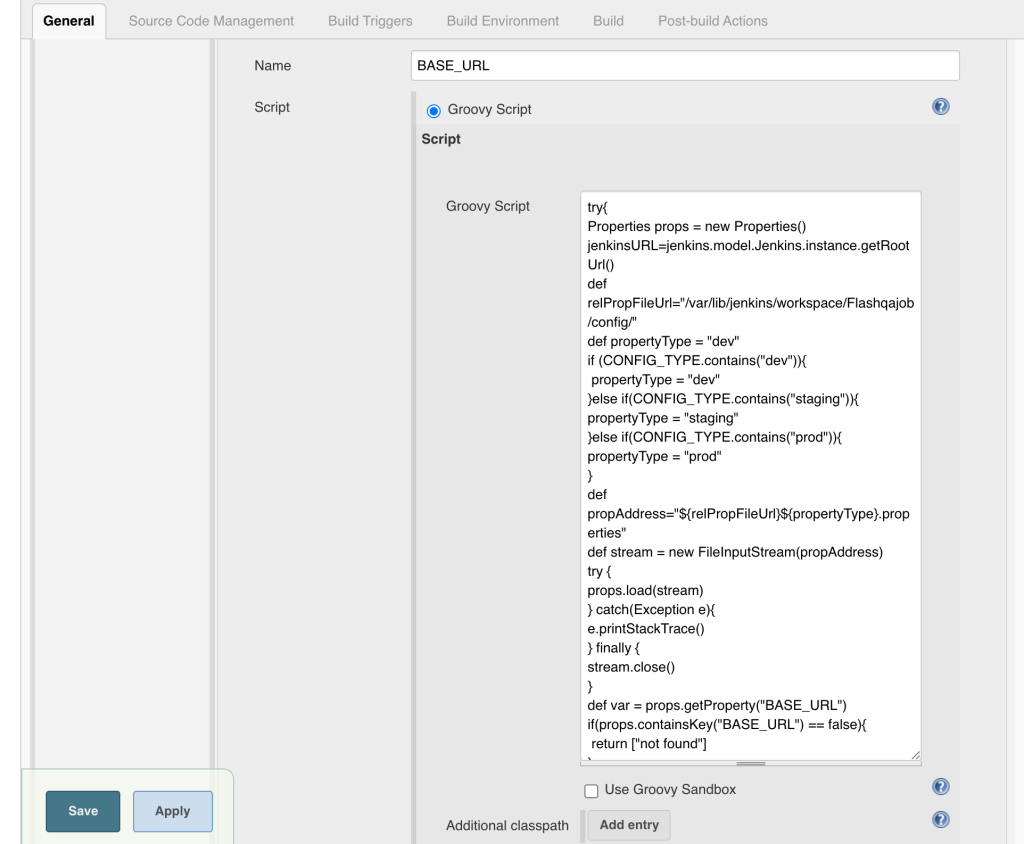
Lets go through with the groovy code, how it is reading properties.
i) We give the path of config folder in our workspace.
ii) We are loading properties file based on config type (which is taken as reference parameter)
iii) Loading file stream in properties object
iv) Getting value of based on key name
v) We have also handled for property not found case.

try{
Properties props = new Properties()
jenkinsURL=jenkins.model.Jenkins.instance.getRootUrl()
def relPropFileUrl="/var/lib/jenkins/workspace/TestAppJob/config/"
def propertyType = "dev"
if (CONFIG_TYPE.contains("dev")){
 propertyType = "dev"
}else if(CONFIG_TYPE.contains("staging")){
propertyType = "staging"
}else if(CONFIG_TYPE.contains("prod")){
propertyType = "prod"
}
def propAddress="${relPropFileUrl}${propertyType}.properties"
def stream = new FileInputStream(propAddress)
try {
props.load(stream)
} catch(Exception e){
e.printStackTrace()
} finally {
stream.close()
}
def var = props.getProperty("BASE_URL")
if(props.containsKey("BASE_URL") == false){
 return ["not found"]
}
return [var]
}catch (Exception e){
return[e.getMessage()]
}

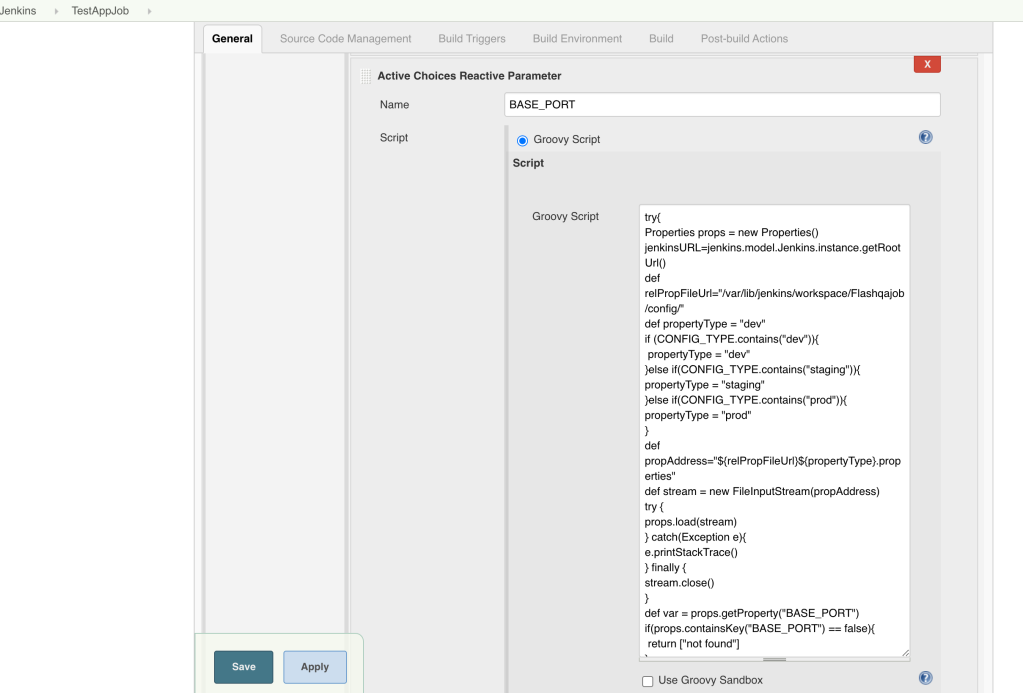
Same we did for Base port parameter.

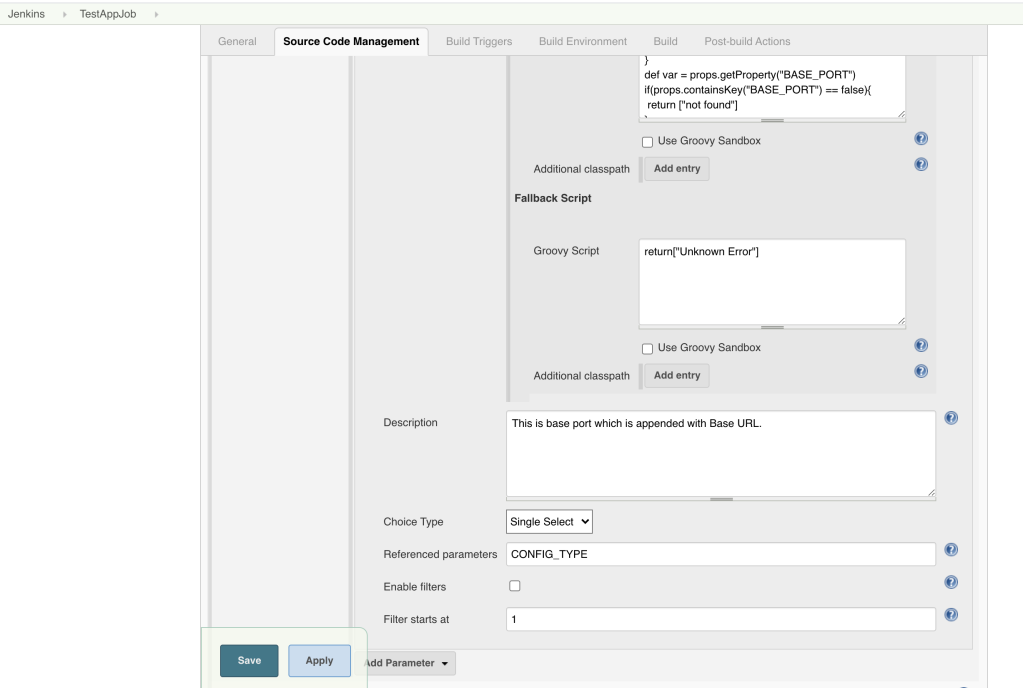
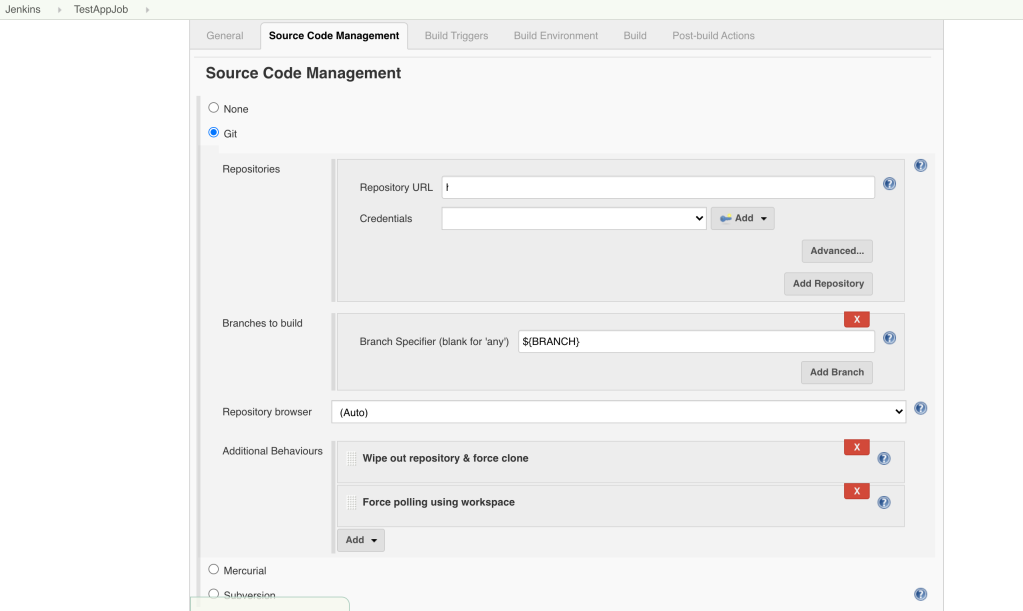
In SCM section we have given path of our repository and credentials to access code base (removed in screenshot).

In Build Triggers Section, we have used polling so that it can build APK if any changes found in master branch. You can check in Git Polling Log Section, it will show whether changes found or not and then only it will build for new APK. It will also update workspace while building APK.

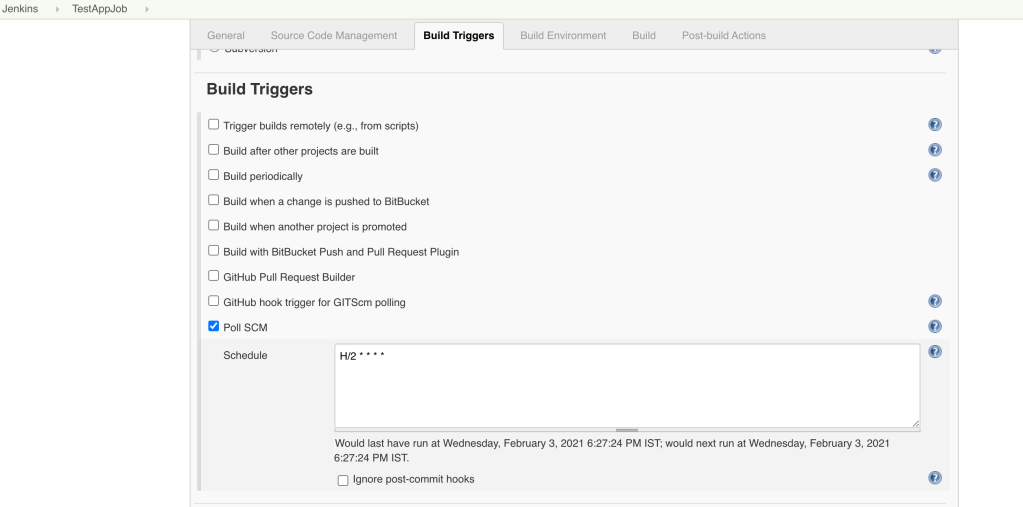
We can set the schedulers based on time, date or month also. We have set for every 2 minutes.
Please note that polling will only happen with Master branch instead of any other feature branches.

Build Section

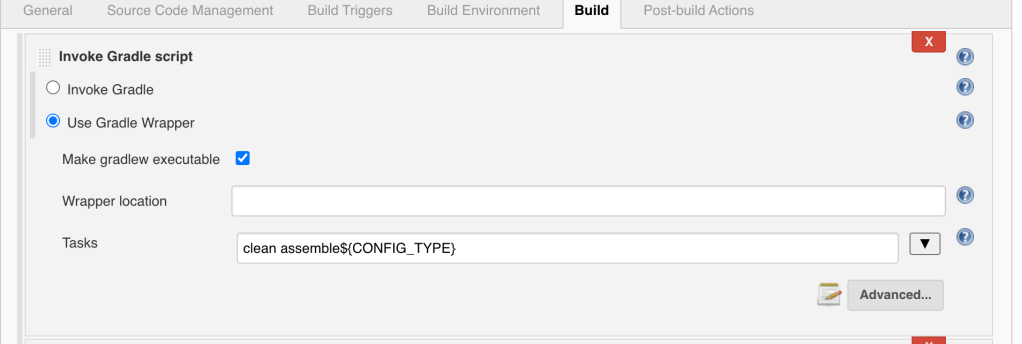
We have provided in task “clean assemble${CONFIG_TYPE}”, as we have to build APK only for selected type of Config Type or Product Flavour instead of all types of flavours which will much time consuming.

For Signing APK for release version only we have used multiple Or conditions.

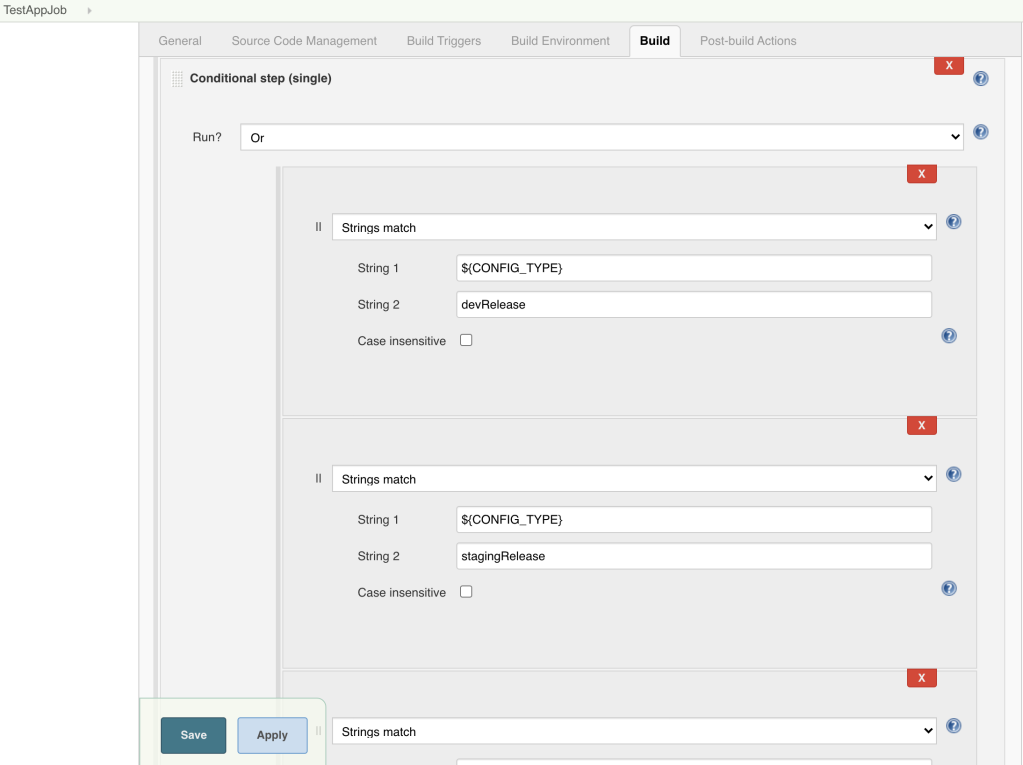
Please note that we are only signing build which are of Release flavour. And that is why we have only allowed for three types of config type.
Also we have stored keystore file in jenkins -> Credentials section.
And using Id generated by jenkins.

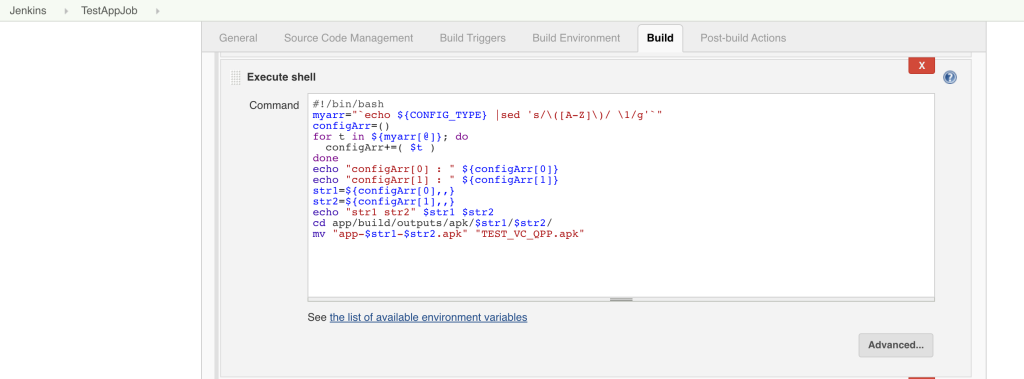
Then we have used shell scripting for renaming the APK.
i) We are splitting config type value.
ii) Moving to specific folder where APK is stored.
iii) As folder can be debug/staging/prod and it can further be debug/release. Therefore we have used config type.
iv) Changing the name APK.

Post Build Actions

We can either upload build to any repository or not based on config type. For that we have used shell scripting.

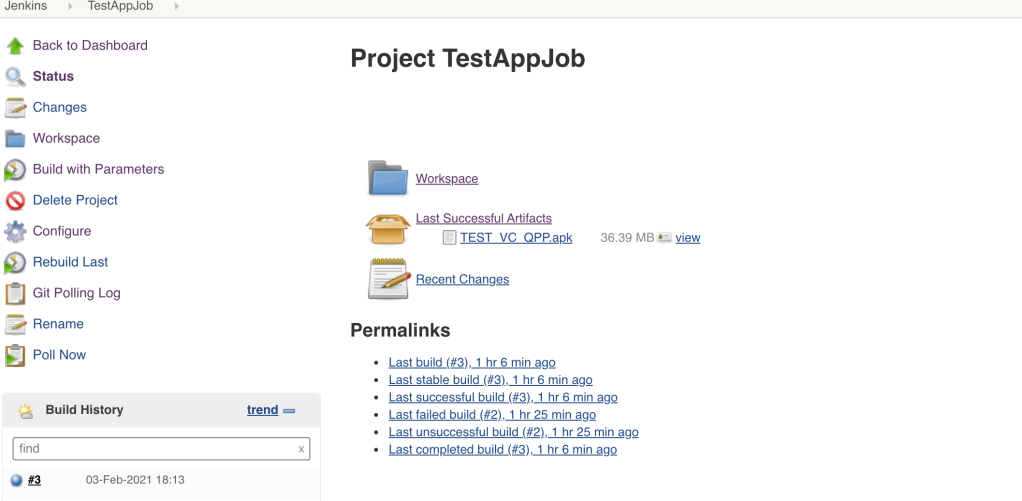
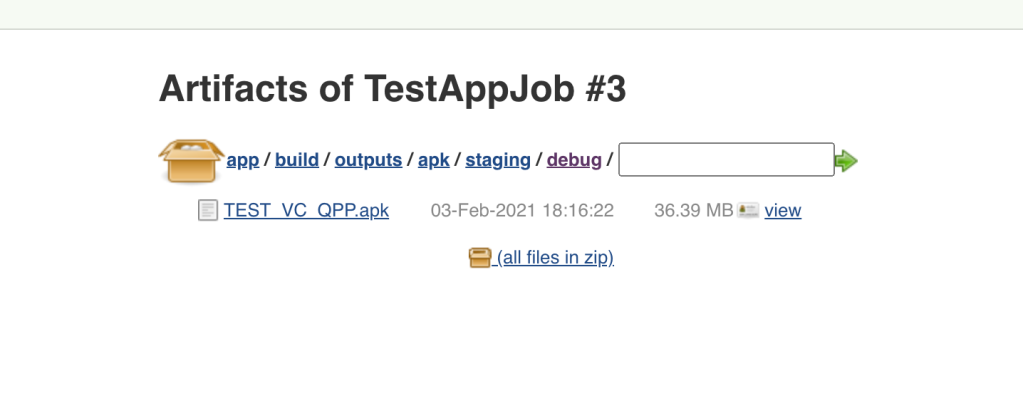
Finally we are storing APK file in Jenkins so that APK is available else it will not store APK.

And we can download and use it.

Problems we faced:
1) We were not able to take updated workspace before building. As we are taking parameters values from properties file we have in code base, so we require to have updated code base at any given point of time.
Solution: We used SCM Polling feature to get updated code (it will create one build and it can fail due to no params value available or No Such Property issue, but we will get updated properties for params).
We can also use Git Webhook to trigger for new build, as polling is expensive.

2) We were not able to find or update workspace for any other branch (or on branch selection).
For example, we have to build for FB_TEST_TWO branch, but we will not be getting its workspace till we actually build for this branch and it will be having previous workspace properties only.
Solution: For this we might require to use Pipeline plugin and specify steps for this.
Following are the links:
https://support.cloudbees.com/hc/en-us/articles/115003945572-Pipeline-Build-with-git-step-on-a-specific-branch-is-triggered-by-a-different-branch

This blog will be helpful when you have to manually build APK from jenkins job and project is having multiple build variants.

It would be really appreciable if you let me know for any updates/changes or any other better alternative for having product flavours in Android Jenkins job.

Thanks for reading ! 🙂

References:
1) https://www.robosoftin.com/blog/configuring-android-builds
2) https://medium.com/bbc-design-engineering/signing-in-the-rain-or-why-you-should-let-jenkins-do-android-release-builds-c08228213242
3) https://sathishpk.wordpress.com/2016/03/07/jenkinsgroovyactivechoiceparameter-rendering-dynamic-parameter-by-reading-only-keys-from-property-file/
4) https://plugins.jenkins.io/uno-choice/

Transfer Items from one Recyclerview to another and vice versa.

Hello Guys,

We have many examples of swiping up & down and left & right or exchanging of data items/rows in same recyclerview.

Now what if you have to exchange data item/row between two recyclerviews.

So in this post, we will see exchange of items from one recyclerview to another and vice versa.
In this we have used concept of Data Binding (please refer Data Binding (MVVM) I/O 2016).

1) One side/way transfer :

Here we have taken two recyclerviews, one at bottom (Vertical) and second one at top (Horizontal).
In this we will transfer data item of Vertical Recyclerview to Horizontal Recyclerview.

Please see the sequence of the pics :

MainActivity

main_screen.png


Selecting Item

selected_item.png


Dropping Item to another Recyclerview

dropping_item.png

 
Item in another Recyclerview

item_in_another_recylerview.png


Multiple Items in Second Recyclerview

multiple_items_seocnd_recyclerview.png


Now how we did it is much important, please look at the below steps :

1) We have to implement OnDragListener of View in our Main Activity.
(This listener gives us access to drag and drop the views with it events).

2) Setting the this drag listener on recyclerview (where we have to set dragged items, in our case its Horizontal Recylerview).

3) And the items which are to be dragged (Vertical Recyclerview Items), so we have set long click on it in ExcercieListAdapter.
So that it will get selected and make it able to move.

4) In Drag listener we will get the position of item long clicked.

5) In Action_Drop event, we will get the item moved, so that we can remove the item from ExerciseList (Main List of all items) and add it to exerciseSelectedList.
And finally updating the adapter.

6) In Action_Drag_Ended, making the selected item visible, so that if user does not move it to another recyclerview, then it should be placed to its original position.

To make this all we have taken two recyclerviews, two different layout for row items, one adapter which manages both the recyclerview.

Main Activity

package com.example.recyclerviewexchangeitems;

import android.databinding.DataBindingUtil;
import android.databinding.ObservableArrayList;
import android.support.v7.app.AppCompatActivity;
import android.os.Bundle;
import android.support.v7.widget.RecyclerView;
import android.view.DragEvent;
import android.view.View;

import com.example.recyclerviewexchangeitems.databinding.MainActivityBinding;

import java.util.ArrayList;

public class MainActivity extends AppCompatActivity implements View.OnDragListener {

    private MainActivityBinding mainActivityBinding;
    public ObservableArrayList<ExcercisePojo> exerciseList;
    public ObservableArrayList<ExcercisePojo> exerciseSelectedList = new ObservableArrayList<>();
    public ExcercisePojo exerciseToMove;
    private int newContactPosition = -1;

    @Override
    protected void onCreate(Bundle savedInstanceState) {
        super.onCreate(savedInstanceState);
        mainActivityBinding = DataBindingUtil.setContentView(this, R.layout.activity_main);
        loadExerciseData();
        mainActivityBinding.setMainActivity(this);
        mainActivityBinding.rcvSelectedExercise.setOnDragListener(this);
    }


    public void loadExerciseData() {
        exerciseList = new ObservableArrayList<>();
        for (int i = 1; i <= 10; i++) {
            exerciseList.add(new ExcercisePojo(i, "exercise " + i));
        }
    }

    @Override
    public boolean onDrag(View view, DragEvent dragEvent) {
        View selectedView = (View) dragEvent.getLocalState();
        RecyclerView rcvSelected = (RecyclerView) view;
        int currentPosition = -1;
        try {
            currentPosition = mainActivityBinding.rcvChooseExercise.getChildAdapterPosition(selectedView);

            // Ensure the position is valid.
            if (currentPosition != -1) {
                exerciseToMove = exerciseList.get(currentPosition);
            }
        } catch (Exception e) {
            e.printStackTrace();
        }

        switch (dragEvent.getAction()) {
            case DragEvent.ACTION_DRAG_LOCATION:
                View onTopOf = rcvSelected.findChildViewUnder(dragEvent.getX(), dragEvent.getY());
                newContactPosition = rcvSelected.getChildAdapterPosition(onTopOf);
                break;
            case DragEvent.ACTION_DRAG_ENTERED:
                break;
            case DragEvent.ACTION_DRAG_EXITED:
                break;
            case DragEvent.ACTION_DROP:
                //when Item is dropped off to recyclerview.
                exerciseSelectedList.add(exerciseToMove);
                exerciseList.remove(exerciseToMove);
                mainActivityBinding.rcvChooseExercise.getAdapter().notifyItemRemoved(currentPosition);
                mainActivityBinding.executePendingBindings();

                //This is to hide/add the container!
                /*ViewGroup owner = (ViewGroup) (view.getParent());
                if (owner != null) {
                    //owner.removeView(selectedView);
                    //owner.addView(selectedView);

                    try {
                        LinearLayout rlContainer = (LinearLayout) view;
                        rlContainer.addView(selectedView);
                    } catch (Exception e) {
                        e.printStackTrace();
                    }
                    //selectedView.setVisibility(View.VISIBLE);
                }*/

                break;

            case DragEvent.ACTION_DRAG_ENDED:
                // Reset the visibility for the Contact item's view.
                // This is done to reset the state in instances where the drag action didn't do anything.
                selectedView.setVisibility(View.VISIBLE);
                // Boundary condition, scroll to top is moving list item to position 0.
                if (newContactPosition != -1) {
                    rcvSelected.scrollToPosition(newContactPosition);
                    newContactPosition = -1;
                } else {
                    rcvSelected.scrollToPosition(0);
                }
            default:
                break;
        }
        return true;
    }
}


ExercisePojo

package com.example.recyclerviewexchangeitems;

/**
 * Created by Sumeet on 16-07-2017.
 */

public class ExcercisePojo {
    public int exerciseId;
    public String name;

    public ExcercisePojo(int exerciseId, String name) {
        this.exerciseId = exerciseId;
        this.name = name;
    }
}


ExerciseListAdapter

package com.example.recyclerviewexchangeitems;

import android.content.ClipData;
import android.content.Context;
import android.databinding.DataBindingUtil;
import android.databinding.ObservableArrayList;
import android.databinding.ObservableList;
import android.databinding.ViewDataBinding;
import android.support.v7.widget.RecyclerView;
import android.view.LayoutInflater;
import android.view.View;
import android.view.ViewGroup;

import com.example.recyclerviewexchangeitems.databinding.ChooseExerciseItemBinding;
import com.example.recyclerviewexchangeitems.databinding.SelectedExerciseItemBinding;

/**
 * Created by Sumeet on 16-07-2017.
 */

public class ExcerciseListAdapter extends RecyclerView.Adapter<ExcerciseListAdapter.ProjectHolder> {

    private ObservableList<ExcercisePojo> exerciseObservableList = new ObservableArrayList<>();
    private Context context;
    private RecyclerView recyclerExercise;
    private int layoutId;

    public ExcerciseListAdapter(RecyclerView recyclerExercise, ObservableArrayList<ExcercisePojo> exerciseObservableList, int layoutId) {
        this.exerciseObservableList = exerciseObservableList;
        this.recyclerExercise = recyclerExercise;
        this.layoutId = layoutId;
    }

    @Override
    public ProjectHolder onCreateViewHolder(ViewGroup parent, int viewType) {
        View v = LayoutInflater.from(parent.getContext()).inflate(layoutId, parent, false);
        context = parent.getContext();
        return new ProjectHolder(v);
    }

    @Override
    public void onBindViewHolder(ProjectHolder holder, int position) {
        final ExcercisePojo excercisePojo = exerciseObservableList.get(position);
        if (layoutId == R.layout.layout_choose_exercise_item) {
            ChooseExerciseItemBinding chooseExerciseItemBinding = (ChooseExerciseItemBinding) holder.chooseExerciseItemBinding;
            chooseExerciseItemBinding.setExercise(excercisePojo);
            chooseExerciseItemBinding.setChooseExerciseListAdapter(this);
        } else {
            SelectedExerciseItemBinding selectedExerciseItemBinding = (SelectedExerciseItemBinding) holder.chooseExerciseItemBinding;
            selectedExerciseItemBinding.setExercise(excercisePojo);
            selectedExerciseItemBinding.setChooseExerciseListAdapter(this);
        }
        holder.chooseExerciseItemBinding.executePendingBindings();
    }

    @Override
    public int getItemCount() {
        if (exerciseObservableList == null) {
            return 0;
        }
        return exerciseObservableList.size();
    }

    public class ProjectHolder extends RecyclerView.ViewHolder {
        public ViewDataBinding chooseExerciseItemBinding;

        public ProjectHolder(View itemView) {
            super(itemView);
            chooseExerciseItemBinding = DataBindingUtil.bind(itemView);
        }
    }


    public boolean onLongClick(View view) {
        ClipData data = ClipData.newPlainText("", "");
        View.DragShadowBuilder shadowBuilder = new View.DragShadowBuilder(view);
        view.startDrag(data, shadowBuilder, view, 0);
        view.setVisibility(View.INVISIBLE);
        return true;
    }

   /* public void onListItemClick(View view) {
        Intent intent = new Intent(context, ExerciseCategoryDetail.class);
        Bundle bundle = new Bundle();
        int position = recyclerExercise.getChildLayoutPosition(view);
        //Utils.makeShortToast(context, "pos : " + position);
        ExerciseCategoryPojo excercisePojo = exerciseObservableList.get(position);
        bundle.putParcelable(Constants.EXCERCISE_CATEGORY_OBJ, excercisePojo);
        bundle.putBoolean(Constants.CAN_ADD_EXERCISE, true);
        intent.putExtras(bundle);
        context.startActivity(intent);
    }
*/

}

 
BindingUtils

package com.example.recyclerviewexchangeitems;

import android.databinding.BindingAdapter;
import android.databinding.ObservableArrayList;
import android.support.v7.widget.GridLayoutManager;
import android.support.v7.widget.LinearLayoutManager;
import android.support.v7.widget.RecyclerView;

/**
 * Created by Sumeet on 16-07-2017.
 */

public class BindingUtils {

    @BindingAdapter({"bind:exerciseChooseItems", "bind:layoutId"})
    public static void bindExerciseList(RecyclerView view, ObservableArrayList<ExcercisePojo> list, int layoutId) {
        GridLayoutManager layoutManager = new GridLayoutManager(view.getContext(), 3);
        view.setLayoutManager(layoutManager);
        view.setAdapter(new ExcerciseListAdapter(view, list, layoutId));
    }


    @BindingAdapter({"bind:exerciseHorizontalItems", "bind:layoutId"})
    public static void bindHorizontalList(RecyclerView view, ObservableArrayList<ExcercisePojo> list, int layoutId) {
        LinearLayoutManager layoutManager = new LinearLayoutManager(view.getContext(), LinearLayoutManager.HORIZONTAL, false);
        view.setLayoutManager(layoutManager);
        view.setAdapter(new ExcerciseListAdapter(view, list, layoutId));
    }

}


drawable/shape_pink_circle.xml

<shape xmlns:android="http://schemas.android.com/apk/res/android"
    android:shape="oval">
    <!--<stroke android:width="1dp" />-->

    <solid android:color="@color/colorAccent" />
</shape>


drawable/shape_purple_circle.xml

<shape xmlns:android="http://schemas.android.com/apk/res/android"
    android:shape="oval">
    <!--<stroke android:width="1dp" />-->

    <solid android:color="@color/dark_purple" />

</shape>


layout/activity_main

<?xml version="1.0" encoding="utf-8"?>
<layout xmlns:android="http://schemas.android.com/apk/res/android"
    xmlns:app="http://schemas.android.com/apk/res-auto">

    <data class="MainActivityBinding">

        <import type="com.example.recyclerviewexchangeitems.R" />

        <!--<variable
            name="chooseExerciseFragment"
            type="com.stepett.app.fragments.excercise.ChooseExerciseFragment" />-->

        <variable
            name="mainActivity"
            type="com.example.recyclerviewexchangeitems.MainActivity" />

    </data>

    <RelativeLayout
        android:layout_width="match_parent"
        android:layout_height="match_parent">


        <View
            android:id="@+id/view1"
            android:layout_width="match_parent"
            android:layout_height="@dimen/scale_1dp"
            android:layout_marginTop="@dimen/scale_20dp"
            android:background="@color/colorPrimaryDark" />

        <android.support.v7.widget.RecyclerView
            android:id="@+id/rcv_selected_exercise"
            android:layout_width="match_parent"
            android:layout_height="@dimen/scale_110dp"
            android:layout_below="@id/view1"
            android:paddingTop="@dimen/scale_10dp"
            app:exerciseHorizontalItems="@{mainActivity.exerciseSelectedList}"
            app:layoutId="@{R.layout.layout_selected_exercise_item}" />


        <View
            android:id="@+id/view2"
            android:layout_width="match_parent"
            android:layout_height="@dimen/scale_1dp"
            android:layout_below="@id/rcv_selected_exercise"
            android:background="@color/colorPrimaryDark" />

        <LinearLayout
            android:id="@+id/ll_filter_exrecise"
            android:layout_width="match_parent"
            android:layout_height="@dimen/scale_40dp"
            android:layout_alignParentBottom="true"
            android:layout_marginBottom="@dimen/scale_10dp"
            android:orientation="vertical">

        </LinearLayout>

        <android.support.v7.widget.RecyclerView
            android:id="@+id/rcv_choose_exercise"
            android:layout_width="match_parent"
            android:layout_height="match_parent"
            android:layout_above="@id/ll_filter_exrecise"
            android:layout_below="@id/view2"
            android:layout_marginBottom="@dimen/scale_10dp"
            android:layout_marginTop="@dimen/scale_10dp"
            app:exerciseChooseItems="@{mainActivity.exerciseList}"
            app:layoutId="@{R.layout.layout_choose_exercise_item}" />


    </RelativeLayout>
</layout>

layout/layout_choose_exercise_item.xml

<layout xmlns:android="http://schemas.android.com/apk/res/android">

    <data class="ChooseExerciseItemBinding">

        <variable
            name="exercise"
            type="com.example.recyclerviewexchangeitems.ExcercisePojo" />

        <variable
            name="chooseExerciseListAdapter"
            type="com.example.recyclerviewexchangeitems.ExcerciseListAdapter" />

    </data>

    <RelativeLayout
        android:id="@+id/rl_exercise_type"
        android:layout_width="@dimen/scale_95dp"
        android:layout_height="@dimen/scale_90dp"
        android:background="@drawable/shape_purple_circle"
        android:gravity="center"
        android:onLongClick="@{chooseExerciseListAdapter.onLongClick}">

        <!--android:onClick="@{chooseExerciseListAdapter.onListItemClick}"-->


        <TextView
            android:id="@+id/tv_exercise_type"
            android:layout_width="wrap_content"
            android:layout_height="wrap_content"
            android:gravity="center"
            android:text="@{exercise.name}"
            android:textAllCaps="true"
            android:textColor="@color/white"
            android:textSize="@dimen/txt_12sp" />

    </RelativeLayout>

</layout>

layout/layout_selected_exercise_item.xml

<layout xmlns:android="http://schemas.android.com/apk/res/android">

    <data class="SelectedExerciseItemBinding">

        <variable
            name="exercise"
            type="com.example.recyclerviewexchangeitems.ExcercisePojo" />

        <variable
            name="chooseExerciseListAdapter"
            type="com.example.recyclerviewexchangeitems.ExcerciseListAdapter" />

    </data>

    <RelativeLayout
        android:id="@+id/rl_exercise_type"
        android:layout_width="@dimen/scale_95dp"
        android:layout_height="@dimen/scale_90dp"
        android:layout_marginLeft="@dimen/scale_10dp"
        android:background="@drawable/shape_pink_circle"
        android:gravity="center">
        <!--android:onLongClick="@{chooseExerciseListAdapter.onLongClick}"-->


        <TextView
            android:id="@+id/tv_exercise_type"
            android:layout_width="wrap_content"
            android:layout_height="wrap_content"
            android:gravity="center"
            android:text="@{exercise.name}"
            android:textAllCaps="true"
            android:textColor="@color/white"
            android:textSize="@dimen/txt_12sp" />

    </RelativeLayout>

</layout>


Please find code at :
https://github.com/Sunny1989/RecyclerviewExchangeItems


2) Two side/way transfer :

In this we will exchange items of both the recyclerviews (Vertical and Horizontal).

For this we have to make following changes:

1) Implement OndragListener for both Recyclerview.
Here we have added one more listener (for Vertical Recyclerview).

2) We have to implement onLongClick for both the recyclerviews items.

Please check the following code changes :

Main Activity

package com.example.recyclerviewtwowayexchangeitems;

import android.databinding.DataBindingUtil;
import android.databinding.ObservableArrayList;
import android.support.v7.app.AppCompatActivity;
import android.os.Bundle;
import android.support.v7.widget.LinearLayoutManager;
import android.support.v7.widget.RecyclerView;
import android.view.DragEvent;
import android.view.View;

import com.example.recyclerviewtwowayexchangeitems.databinding.MainActivityBinding;

public class MainActivity extends AppCompatActivity implements View.OnDragListener {

    private MainActivityBinding mainActivityBinding;
    public ObservableArrayList<ExcercisePojo> exerciseList;
    public ObservableArrayList<ExcercisePojo> exerciseSelectedList = new ObservableArrayList<>();
    public ExcercisePojo exerciseToMove;
    private int newContactPosition = -1;

    private int currentPosition = -1;
    private boolean isExerciseAdded = false;
    public static boolean isFromExercise = false;

    @Override
    protected void onCreate(Bundle savedInstanceState) {
        super.onCreate(savedInstanceState);
        mainActivityBinding = DataBindingUtil.setContentView(this, R.layout.activity_main);
        loadExerciseData();
        mainActivityBinding.setMainActivity(this);
        mainActivityBinding.rcvSelectedExercise.setOnDragListener(this);


        mainActivityBinding.rcvChooseExercise.setOnDragListener(new MyDragInsideRcvListener());
        int spacingInPixels = getResources().getDimensionPixelSize(R.dimen.scale_3dp);
        mainActivityBinding.rcvChooseExercise.addItemDecoration(new SpaceItemDecoration(spacingInPixels));
    }


    public void loadExerciseData() {
        exerciseList = new ObservableArrayList<>();
        for (int i = 1; i <= 10; i++) {
            exerciseList.add(new ExcercisePojo(i, "exercise " + i));
        }
    }

    @Override
    public boolean onDrag(View view, DragEvent dragEvent) {
        View selectedView = (View) dragEvent.getLocalState();
        RecyclerView rcvSelected = (RecyclerView) view;

        try {
            int currentPosition = mainActivityBinding.rcvChooseExercise.getChildAdapterPosition(selectedView);

            // Ensure the position is valid.
            if (currentPosition != -1) {
                exerciseToMove = exerciseList.get(currentPosition);
            }
        } catch (Exception e) {
            e.printStackTrace();
        }

        switch (dragEvent.getAction()) {
            case DragEvent.ACTION_DRAG_LOCATION:
                View onTopOf = rcvSelected.findChildViewUnder(dragEvent.getX(), dragEvent.getY());
                newContactPosition = rcvSelected.getChildAdapterPosition(onTopOf);
                break;
            case DragEvent.ACTION_DRAG_ENTERED:
                break;
            case DragEvent.ACTION_DRAG_EXITED:
                break;
            case DragEvent.ACTION_DROP:
                //when Item is dropped off to recyclerview.
                if (isFromExercise) {
                    exerciseSelectedList.add(exerciseToMove);
                    exerciseList.remove(exerciseToMove);
                    mainActivityBinding.rcvChooseExercise.getAdapter().notifyItemRemoved(currentPosition);
                    mainActivityBinding.executePendingBindings();
                }
                //This is to hide/add the container!
                /*ViewGroup owner = (ViewGroup) (view.getParent());
                if (owner != null) {
                    //owner.removeView(selectedView);
                    //owner.addView(selectedView);

                    try {
                        LinearLayout rlContainer = (LinearLayout) view;
                        rlContainer.addView(selectedView);
                    } catch (Exception e) {
                        e.printStackTrace();
                    }
                    //selectedView.setVisibility(View.VISIBLE);
                }*/

                break;

            case DragEvent.ACTION_DRAG_ENDED:
                // Reset the visibility for the Contact item's view.
                // This is done to reset the state in instances where the drag action didn't do anything.
                selectedView.setVisibility(View.VISIBLE);
                // Boundary condition, scroll to top is moving list item to position 0.
                if (newContactPosition != -1) {
                    rcvSelected.scrollToPosition(newContactPosition);
                    newContactPosition = -1;
                } else {
                    rcvSelected.scrollToPosition(0);
                }
            default:
                break;
        }
        return true;
    }

    /**
     * This listener class is for Vertical Recyclerview.
     */
    class MyDragInsideRcvListener implements View.OnDragListener {
        @Override
        public boolean onDrag(View v, DragEvent event) {
            int action = event.getAction();
            RecyclerView rcv = (RecyclerView) v;

            View selectedView = (View) event.getLocalState();
            try {
                int currentPosition = rcv.getChildAdapterPosition(selectedView);
                // Ensure the position is valid.
                if (currentPosition != -1) {
                    exerciseToMove = exerciseSelectedList.get(currentPosition);
                    //exerciseSelectedList.get(currentPosition);
                }
            } catch (Exception e) {
                e.printStackTrace();
            }

            switch (event.getAction()) {
                case DragEvent.ACTION_DRAG_LOCATION:
                    View onTopOf = rcv.findChildViewUnder(event.getX(), event.getY());
                    newContactPosition = rcv.getChildAdapterPosition(onTopOf);

                    //Flag for our own understanding!
                    //isFromExercise = true;

                    //This is for internal dragging (inside recyclerview only).  VVIP!
                    // Ensure the new position is valid.

                    //If you wanted to swap the items in recyclerview only.
                    //It requires bit changes.
                   /* if (newContactPosition != -1) {
                        LinearLayoutManager layoutManager = (LinearLayoutManager) rcv.getLayoutManager();
                        int firstVisiblePosition = layoutManager.findFirstCompletelyVisibleItemPosition();
                        int lastVisiblePosition = layoutManager.findLastVisibleItemPosition();

                        // Scroll up or down one if we are over the first or last visible list item.
                        if (newContactPosition >= lastVisiblePosition)
                            layoutManager.scrollToPositionWithOffset(firstVisiblePosition + 1, 0);
                        else if (newContactPosition <= firstVisiblePosition)
                            layoutManager.scrollToPositionWithOffset(firstVisiblePosition - 1, 0);

                        // Update the location of the Contact
                        exerciseList.remove(exerciseToMove);
                        exerciseList.add(newContactPosition, exerciseToMove);
                        rcv.getAdapter().notifyDataSetChanged();
                    }*/
                    break;
                case DragEvent.ACTION_DRAG_ENDED:
                    // Reset the visibility for the Contact item's view.
                    // This is done to reset the state in instances where the drag action didn't do anything.
                    selectedView.setVisibility(View.VISIBLE);
                    // Boundary condition, scroll to top is moving list item to position 0.
                    if (newContactPosition != -1) {
                        rcv.scrollToPosition(newContactPosition);
                        newContactPosition = -1;
                    } else {
                        rcv.scrollToPosition(0);
                    }
                    break;
                case DragEvent.ACTION_DROP:
                    if (!isFromExercise) {
                        //THIS IS FOR WHEN WE TAKE ITEM OF OTHER LIST AND DROP IN THIS LIST.
                        exerciseList.add(exerciseToMove);
                        exerciseSelectedList.remove(exerciseToMove);
                        mainActivityBinding.rcvChooseExercise.getAdapter().notifyItemInserted(currentPosition);
                        mainActivityBinding.executePendingBindings();
                    }
                    break;

                default:
                    break;
            }
            return true;
        }
    }
}

And in this I have also included the code to swap the data items (Vertical Recyclerview).
This code is commented (as it requires bit changes), but it can be used.
In MyDragInsideRcvListener, check the commented code in DragEvent.ACTION_DRAG_LOCATION and it swaps the items within recycelrview area.

To use it, just remove comments the code.
Check the following screen shots of internal swapping of items :

Exercise 9 is selected to swap internally

swap2.png
Exercise 9 , is placed at Exercise 8.

sawp3.png


ExerciseListAdapter

package com.example.recyclerviewtwowayexchangeitems;

import android.content.ClipData;
import android.content.Context;
import android.databinding.DataBindingUtil;
import android.databinding.ObservableArrayList;
import android.databinding.ObservableList;
import android.databinding.ViewDataBinding;
import android.support.v7.widget.RecyclerView;
import android.view.LayoutInflater;
import android.view.View;
import android.view.ViewGroup;

import com.example.recyclerviewtwowayexchangeitems.databinding.ChooseExerciseItemBinding;
import com.example.recyclerviewtwowayexchangeitems.databinding.SelectedExerciseItemBinding;

/**
 * Created by Sumeet on 16-07-2017.
 */

public class ExcerciseListAdapter extends RecyclerView.Adapter<ExcerciseListAdapter.ProjectHolder> {

    private ObservableList<ExcercisePojo> exerciseObservableList = new ObservableArrayList<>();
    private Context context;
    private RecyclerView recyclerExercise;
    private int layoutId;

    public ExcerciseListAdapter(RecyclerView recyclerExercise, ObservableArrayList<ExcercisePojo> exerciseObservableList, int layoutId) {
        this.exerciseObservableList = exerciseObservableList;
        this.recyclerExercise = recyclerExercise;
        this.layoutId = layoutId;
    }

    @Override
    public ProjectHolder onCreateViewHolder(ViewGroup parent, int viewType) {
        View v = LayoutInflater.from(parent.getContext()).inflate(layoutId, parent, false);
        context = parent.getContext();
        return new ProjectHolder(v);
    }

    @Override
    public void onBindViewHolder(ProjectHolder holder, int position) {
        final ExcercisePojo excercisePojo = exerciseObservableList.get(position);
        if (layoutId == R.layout.layout_choose_exercise_item) {
            ChooseExerciseItemBinding chooseExerciseItemBinding = (ChooseExerciseItemBinding) holder.chooseExerciseItemBinding;
            chooseExerciseItemBinding.setExercise(excercisePojo);
            chooseExerciseItemBinding.setChooseExerciseListAdapter(this);
        } else {
            SelectedExerciseItemBinding selectedExerciseItemBinding = (SelectedExerciseItemBinding) holder.chooseExerciseItemBinding;
            selectedExerciseItemBinding.setExercise(excercisePojo);
            selectedExerciseItemBinding.setChooseExerciseListAdapter(this);
        }
        holder.chooseExerciseItemBinding.executePendingBindings();
    }

    @Override
    public int getItemCount() {
        if (exerciseObservableList == null) {
            return 0;
        }
        return exerciseObservableList.size();
    }

    public class ProjectHolder extends RecyclerView.ViewHolder {
        public ViewDataBinding chooseExerciseItemBinding;

        public ProjectHolder(View itemView) {
            super(itemView);
            chooseExerciseItemBinding = DataBindingUtil.bind(itemView);
        }
    }


    public boolean onLongClick(View view) {
        ClipData data = ClipData.newPlainText("", "");
        View.DragShadowBuilder shadowBuilder = new View.DragShadowBuilder(view);
        view.startDrag(data, shadowBuilder, view, 0);
        view.setVisibility(View.INVISIBLE);
        if (layoutId == R.layout.layout_choose_exercise_item) {
            MainActivity.isFromExercise = true;
        } else {
            MainActivity.isFromExercise = false;
        }
        return true;
    }

   /* public void onListItemClick(View view) {
        Intent intent = new Intent(context, ExerciseCategoryDetail.class);
        Bundle bundle = new Bundle();
        int position = recyclerExercise.getChildLayoutPosition(view);
        //Utils.makeShortToast(context, "pos : " + position);
        ExerciseCategoryPojo excercisePojo = exerciseObservableList.get(position);
        bundle.putParcelable(Constants.EXCERCISE_CATEGORY_OBJ, excercisePojo);
        bundle.putBoolean(Constants.CAN_ADD_EXERCISE, true);
        intent.putExtras(bundle);
        context.startActivity(intent);
    }
*/

}

 
layout/layout_choose_exercise_item.xml

<layout xmlns:android="http://schemas.android.com/apk/res/android">

    <data class="ChooseExerciseItemBinding">

        <variable
            name="exercise"
            type="com.example.recyclerviewtwowayexchangeitems.ExcercisePojo" />

        <variable
            name="chooseExerciseListAdapter"
            type="com.example.recyclerviewtwowayexchangeitems.ExcerciseListAdapter" />

    </data>

    <RelativeLayout
        android:id="@+id/rl_exercise_type"
        android:layout_width="@dimen/scale_95dp"
        android:layout_height="@dimen/scale_90dp"
        android:background="@drawable/shape_purple_circle"
        android:gravity="center"
        android:onLongClick="@{chooseExerciseListAdapter.onLongClick}">

        <!--android:onClick="@{chooseExerciseListAdapter.onListItemClick}"-->


        <TextView
            android:id="@+id/tv_exercise_type"
            android:layout_width="wrap_content"
            android:layout_height="wrap_content"
            android:gravity="center"
            android:text="@{exercise.name}"
            android:textAllCaps="true"
            android:textColor="@color/white"
            android:textSize="@dimen/txt_12sp" />

    </RelativeLayout>

</layout>

layout/layout_selected_exercise_item.xml

<layout xmlns:android="http://schemas.android.com/apk/res/android">

    <data class="SelectedExerciseItemBinding">

        <variable
            name="exercise"
            type="com.example.recyclerviewtwowayexchangeitems.ExcercisePojo" />

        <variable
            name="chooseExerciseListAdapter"
            type="com.example.recyclerviewtwowayexchangeitems.ExcerciseListAdapter" />

    </data>

    <RelativeLayout
        android:id="@+id/rl_exercise_type"
        android:layout_width="@dimen/scale_95dp"
        android:layout_height="@dimen/scale_90dp"
        android:layout_marginLeft="@dimen/scale_10dp"
        android:background="@drawable/shape_pink_circle"
        android:gravity="center"
        android:onLongClick="@{chooseExerciseListAdapter.onLongClick}">


        <TextView
            android:id="@+id/tv_exercise_type"
            android:layout_width="wrap_content"
            android:layout_height="wrap_content"
            android:gravity="center"
            android:text="@{exercise.name}"
            android:textAllCaps="true"
            android:textColor="@color/white"
            android:textSize="@dimen/txt_12sp" />

    </RelativeLayout>

</layout>

Rest other part of code is same as above example.

Check the screen shots :

Putting an item from vertical Recyclerview to Horizontal Recyclerview

two_way1.png

Selecting Exercise 2 and putting back in Vertical Recyclerview.

two_way2.png


Putting from Vertical to Horizontal Recylerview

two_way4.png


two_way5.png


Please find the code at :
https://github.com/Sunny1989/RecyclerviewTwoWayExchangeItems

References :
1) https://www.linkedin.com/pulse/new-tutorial-implement-custom-drag-drop-recycler-view-jonathan-beck

2) https://developer.android.com/guide/topics/ui/drag-drop.html

Kindly let me know for any concern.

Thank you. 🙂

SECURING ANDROID SQLITE DB WITH SQLCIPHER AND JNI

Hello Guys,

I am going to tell how to secure android sqlite database, for this we have used :

1) SQLCipher
2) JNI

As you can find simple example (without JNI) in references at last of blog.

1) SQLCipher :
SQLCipher is an open source extension to SQLite that provides transparent 256-bit AES encryption of database files.

Its provides support for Java, Python, Android, iOS, etc.

2) JNI (Java Native Interface):
As to secure it uses 256-bit AES algorithm which requires a key to encrypt or decrypt files.
So we have used JNI to store key securely.

How to integrate in project ?

Steps :

  1. Create New Project
  2. Give package name
  3. Select option “Include c++ support”
  4. Create activity and finish.
  5.  Add the following line in build.gradle (app)
    compile ‘net.zetetic:android-database-sqlcipher:3.5.4’
  6.  Sync the project.

Now good thing is that we do not have to create C++ files and other stuff for JNI.
It will create few files for fetching string values and that much is enough for us.

As in case of database, either user can create a new DB or can use existing DB.
So we will see with both cases, these are :
1) Create a new DB , Encrypt and Read & Write DB.
2) Use Existing DB, encrypt it into new DB and Read & Write.


1) Create a new DB , Encrypt and Read & Write DB.

In this example we have taken one MainActivity which will load Sqlcipher Library and insert a new record in database and again displaying that record in activity only.
We have also used the Data Binding, to learn about Data Binding please refer :
Data Binding (MVVM) I/O 2016


MainActivity.java

package com.example.sqlcipherjniexample;

import android.content.ContentValues;
import android.databinding.DataBindingUtil;
import android.os.Bundle;
import android.support.v7.app.AppCompatActivity;
import android.util.Log;

import com.example.sqlcipherjniexample.databinding.MainActivityBinding;

import net.sqlcipher.Cursor;
import net.sqlcipher.database.SQLiteDatabase;

public class MainActivity extends AppCompatActivity {

    // Used to load the 'native-lib' library on application startup.
    // JNI part!
    static {
        System.loadLibrary("native-lib");
    }

    private MainActivityBinding mainActivityBinding;

    @Override
    protected void onCreate(Bundle savedInstanceState) {
        super.onCreate(savedInstanceState);
        mainActivityBinding = DataBindingUtil.setContentView(this, R.layout.activity_main);

        //Loading Sqlcipher Library
        SQLiteDatabase.loadLibs(this);

        //Inserting data in Sqlcipher Sqlite DB!
        insertDataToDb();

        //Reading from DB!
        showDataFromDb();
    }


    private void insertDataToDb() {
        //Note : Wherever we use Sqlite classes, its all from net.sqlite.database.
        SQLiteDatabase db = DatabaseHelper.getInstance(this).getWritableDatabase(stringFromJNI());

        ContentValues values = new ContentValues();
        values.put(DatabaseHelper.WORD, "Word 1");
        values.put(DatabaseHelper.DEFINITION, "First Word");

        db.insert(DatabaseHelper.TABLE_NAME, null, values);

        db.close();
    }


    private void showDataFromDb() {
        SQLiteDatabase db = DatabaseHelper.getInstance(this).getWritableDatabase(stringFromJNI());
        Cursor cursor = db.rawQuery("SELECT * FROM '" + DatabaseHelper.TABLE_NAME + "';", null);
        Log.d(MainActivity.class.getSimpleName(), "Rows count: " + cursor.getCount());

        String dbValues = "";

        if (cursor.moveToFirst()) {
            do {
                dbValues = dbValues + "\n" + cursor.getString(0) + " , " + cursor.getString(1);
            } while (cursor.moveToNext());
        }

        cursor.close();
        db.close();

        mainActivityBinding.sampleText.setText(dbValues);
    }

    /**
     * A native method that is implemented by the 'native-lib' native library,
     * which is packaged with this application.
     */
    public native String stringFromJNI();
}


activity_main.xml (in layout folder)

<layout xmlns:android="http://schemas.android.com/apk/res/android">

    <data class="MainActivityBinding" />

    <RelativeLayout
        android:layout_width="match_parent"
        android:layout_height="match_parent">

        <TextView
            android:id="@+id/sample_text"
            android:layout_width="wrap_content"
            android:layout_height="wrap_content" />

    </RelativeLayout>
</layout>


Databasehelper.java

package com.example.sqlcipherjniexample;

import android.content.Context;

import net.sqlcipher.database.SQLiteDatabase;
import net.sqlcipher.database.SQLiteOpenHelper;

/**
 * Created by Sumeet on 09-04-2017.
 */

public class DatabaseHelper extends SQLiteOpenHelper {

    private static DatabaseHelper instance;

    public static final int DATABASE_VERSION = 1;
    public static final String DATABASE_NAME = "DICTIONARY_NEW";

    public static final String TABLE_NAME = "FTS";
    public static final String WORD = "word";
    public static final String DEFINITION = "definition";

    private static final String TEXT_TYPE = " TEXT";
    private static final String SQL_CREATE_ENTRIES = "CREATE TABLE " + TABLE_NAME + " (" + WORD + TEXT_TYPE + "," + DEFINITION + TEXT_TYPE + " )";


    private static final String SQL_DELETE_ENTRIES = "DROP TABLE IF EXISTS " + TABLE_NAME;

    public DatabaseHelper(Context context) {
        super(context, DATABASE_NAME, null, DATABASE_VERSION);
    }

    static public synchronized DatabaseHelper getInstance(Context context) {
        if (instance == null) {
            instance = new DatabaseHelper(context);
        }
        return instance;
    }

   
    @Override
    public void onCreate(SQLiteDatabase sqLiteDatabase) {
        sqLiteDatabase.execSQL(SQL_CREATE_ENTRIES);
    }

    @Override
    public void onUpgrade(SQLiteDatabase sqLiteDatabase, int i, int i1) {
        sqLiteDatabase.execSQL(SQL_DELETE_ENTRIES);
        onCreate(sqLiteDatabase);
    }
}


build.gradle (Module : app)

apply plugin: 'com.android.application'

android {
    compileSdkVersion 25
    buildToolsVersion "25.0.1"
    defaultConfig {
        applicationId "com.example.sqlcipherjniexample"
        minSdkVersion 15
        targetSdkVersion 25
        versionCode 1
        versionName "1.0"
        testInstrumentationRunner "android.support.test.runner.AndroidJUnitRunner"
        externalNativeBuild {
            cmake {
                cppFlags ""
            }
        }
    }
    buildTypes {
        release {
            minifyEnabled false
            proguardFiles getDefaultProguardFile('proguard-android.txt'), 'proguard-rules.pro'
        }
    }
    externalNativeBuild {
        cmake {
            path "CMakeLists.txt"
        }
    }

    //Its for data binding.
    dataBinding {
        enabled = true
    }

}

dependencies {
    compile fileTree(dir: 'libs', include: ['*.jar'])
    androidTestCompile('com.android.support.test.espresso:espresso-core:2.2.2', {
        exclude group: 'com.android.support', module: 'support-annotations'
    })
    compile 'com.android.support:appcompat-v7:25.3.1'
    compile 'com.android.support.constraint:constraint-layout:1.0.2'
    testCompile 'junit:junit:4.12'
    compile 'net.zetetic:android-database-sqlcipher:3.5.4'
}


And then we finally test it with Virtual Device / Emulator, with configurations as :
Device : Nexus 5
API level : 23
CPU/ABI : x86

And it worked successfully! 🙂

Please check screen shot below :

MainActivity.png


The most important part is when I tested it with the same example with different device and its configuration are :
Device : Nexus 5
Api level : 25
CPU/ABI : X86_64

So app got crashed!
Please check the screen shot of both the device :

different_architecture.png

So what is the problem and I started searching about it.
Then I found that due this :
SqlCipher does not support 64 bit CPU Architecture

And they have mentioned in their reply :

While there is a pending pull request to add both arm64v8a and x86_64 support to SQLCipher for Android, we are still awaiting integration [2] from OpenSSL directly on these specific platforms before we can continue with the merge. We are unaware of the priority the OpenSSL team has on adding direct support for those platforms within their build process. As soon as that becomes available we will revisit adding support to SQLCipher for Android.

That said, as @commonsguy mentioned, the 32 bit binaries will continue to work on a 64 bit device, however you can not include any other 64 bit binaries within the application. We look forward to expanding further platform support for SQLCipher for Android, however we need OpenSSL to officially support those platforms first.

And when I went in more detail by analyzing our debug.apk.
Android Studio -> Build -> Analyze Apk -> select apk (app-debug.apk in our case)

I found .so files for all types of CPU architecture (32 and 64 bits both):

libs_different_cpu_architecture.png

Detail view :

detail_different_processor.png


But again here we can notice that Sqlcipher generated any .so file not supported architectures like X86_64, arm64-v8a, etc.

So why is it still giving me crash (Still in a doubt !).

Then finally with more searching and struggles I found that :

Sqlcipher for Android Native Libs (JNI)

Just check for the comments and here in more detail they have mentioned :

Due to Android’s preferential loading process, if, for example, your APK is including other third-party libraries that contain native libraries that target architectures other than armeabi, armeabi-v7a, or x86, Android will attempt to load all native libraries from within the folder that is the closest match for its platform architecture, thus causing the error above when it attempts to locate SQLCipher for Android within a 64 bit platform folder.

And now solution to it is :

This issue can be addressed by removing any included native libraries for architectures other than armeabi, armeabi-v7a, and x86; this allows the Android device to load the 32 bit version of all libraries, even on a 64 bit device. For gradle users, you can utilize the ABI split feature.


As per there above suggestion we should APK-Split, which is nothing but to make apk based on denisty (hdpi, xxhdpi, etc.) or for different CPU architecture (x86, mips, etc.)

But here come an another problem to maintain Multiple Apks, which is much complex to maintain and hectic process for developers also.
So we found with some other solution, that is to have only One Apk and which supports all 32 bits ABI/CPU (especially to support SqlCipher) which we manually specify.

Making One Apk with multiple native support (Please see its “Specify ABIs” section.)

And we made following changes in our build.gradle (module:app).
Added ndk block with abiFilters (this will create a single apk with the ABIs we will specify)


defaultConfig {
    ...//Your code
    ndk {
        abiFilters 'x86', 'armeabi', 'armeabi-v7a'
    }
}


And finally it worked ! 🙂

Please see the following screen shot :

working_withall_devices.png


And when we again analyze apk :

only_limited_abis.png
limited_with_sqlcipher.png


You will see that the ABIs we manually defined it created .so files for that only.
As android allows all 32 bit library to work with 64 bit so its working fine with our requirement and this will reduce size also.

Now lets try to extract DB and test it whether its encrypted or not.
Android Studio -> Tools ->Android -> Android Device Monitor -> then choose device -> data ->choose app package id (in our case its “com.example.sqlcipherjniexample”) -> databases -> Database Name (“Dictionary_new” in our case).

extract_db.png

Now If user tries to open it then it will get an error “file is encrypted or is not a database”

not_able_open_db.png
So finally, we got complete working example Sqlcipher with JNI.

Please find the working example at  my github account :
SqlCipher with JNI Example

Now lets see for if an app has existing database and encrypt it and read & write operation.

2) Use Existing DB, encrypt it into new DB and Read & Write.

For this we have taken a predefined database named as DICTIONARY_NEW which is having 5 records.

existing_db_with_data.png


Now here we have copied this existing database in assets folder.

unecrypted_db_assets.png


Make sure this Database is  not encrypted.

MainActivity.java

package com.example.sqlcipherjniexistsdb;

import android.databinding.DataBindingUtil;
import android.support.v7.app.AppCompatActivity;
import android.os.Bundle;
import android.util.Log;
import android.widget.TextView;

import com.example.sqlcipherjniexistsdb.databinding.MainActivityBinding;

import net.sqlcipher.Cursor;
import net.sqlcipher.database.SQLiteDatabase;

import java.io.IOException;

public class MainActivity extends AppCompatActivity {

    // Used to load the 'native-lib' library on application startup.
    static {
        System.loadLibrary("native-lib");
    }

    private MainActivityBinding mainActivityBinding;
    private Databasehelper databaseManager;

    @Override
    protected void onCreate(Bundle savedInstanceState) {
        super.onCreate(savedInstanceState);
        mainActivityBinding = DataBindingUtil.setContentView(this, R.layout.activity_main);


        //Loading Sqlcipher Library
        SQLiteDatabase.loadLibs(this);

        try {
            //Loading data from existing db to encrypted DB!
            loadAllData();

            //Reading from DB!
            showDataFromDb();
        } catch (IOException e) {
            e.printStackTrace();
        }

    }


    public void loadAllData() throws IOException {
        try {
            databaseManager = Databasehelper.getInstance(MainActivity.this);
            databaseManager.createOpenDataBase(stringFromJNI());
        } catch (Exception e) {
            e.printStackTrace();
        }
    }


    private void showDataFromDb() throws IOException {
        SQLiteDatabase db = Databasehelper.getInstance(this).getWritableDatabase(stringFromJNI());
        Cursor cursor = db.rawQuery("SELECT * FROM '" + Databasehelper.TB_FTS + "';", null);
        //Log.d(MainActivity.class.getSimpleName(), "Rows count: " + cursor.getCount());

        String dbValues = "";

        if (cursor.moveToFirst()) {
            do {
                dbValues = dbValues + "\n" + cursor.getString(0) + " , " + cursor.getString(1);
            } while (cursor.moveToNext());
        }

        cursor.close();
        db.close();

        mainActivityBinding.sampleText.setText(dbValues);
        databaseManager.close();
    }


    /**
     * A native method that is implemented by the 'native-lib' native library,
     * which is packaged with this application.
     */
    public native String stringFromJNI();
}


activity_main.xml

<layout xmlns:android="http://schemas.android.com/apk/res/android">

    <data class="MainActivityBinding" />

    <RelativeLayout
        android:layout_width="match_parent"
        android:layout_height="match_parent">

        <TextView
            android:id="@+id/sample_text"
            android:layout_width="wrap_content"
            android:layout_height="wrap_content" />

    </RelativeLayout>
</layout>


Databasehelper.java

package com.example.sqlcipherjniexistsdb;

import android.content.Context;
import android.util.Log;

import net.sqlcipher.database.SQLiteDatabase;
import net.sqlcipher.database.SQLiteOpenHelper;

import java.io.File;
import java.io.FileOutputStream;
import java.io.IOException;
import java.io.InputStream;
import java.io.OutputStream;
import java.sql.SQLException;

/**
 * Created by Sumeet on 23-12-2016.
 */

public class Databasehelper extends SQLiteOpenHelper {
    public static String DB_PATH;
    public static String DB_NAME = "DICTIONARY_NEW";
    //Version Done (2) on 30-04-17
    public static final int DB_VERSION = 1;
    public static final String TB_FTS = "FTS";
    private net.sqlcipher.database.SQLiteDatabase myDB;
    private Context context;
    private static Databasehelper instance;
    public static String KEY;


    public static synchronized Databasehelper getInstance(Context context) {
        if (instance == null) {
            DB_PATH = BuildConfig.DB_PATH;
            instance = new Databasehelper(context);
        }
        return instance;
    }

    public Databasehelper(Context context) {
        super(context, DB_NAME, null, DB_VERSION);
        this.context = context;
    }

    @Override
    public void onCreate(net.sqlcipher.database.SQLiteDatabase sqLiteDatabase) {

    }

    @Override
    public void onUpgrade(net.sqlcipher.database.SQLiteDatabase sqLiteDatabase, int oldVersion, int newVersion) {
    }


    /***
     * Check if the database doesn't exist on device, create new one
     *
     * @throws IOException
     */
    public void createOpenDataBase(String encryptKey) throws IOException {
        //VIP -> checkDataBase method, return false if press Apps in background button (Bottom Right button in device) and remove it from back-stack.
        boolean dbExist = checkDataBase();
        //This key is used to encrypt and decrypt the db!
        KEY = encryptKey;
        if (!dbExist) {
            try {
                //we should pass empty string, when we have to open any other database which is not encrypted by SqlCipher!
                this.getReadableDatabase("");

                //When we use encrypted DB (so that no one can get the data after extracting apk->assets and -> DB)
                //So we are keeping encrypting file only.
                //We made the DB using the above KEY!
                //this.getReadableDatabase(KEY);

                //first we copy from assets folder to app's internal storage!
                copyDataBase();
                //Then we make another db and copy the data in encrypted manner!
                encryptDB();
            } catch (IOException e) {
                Log.d("createOpenDatabase", e.getMessage());
            } catch (Exception e) {
                Log.d("createOpenDB", e.getMessage());
            }
        }

        //Then opening DB!, This is not required as we can db gets open when we call getReadable/getWritable!
        try {
            openDataBase();
        } catch (net.sqlcipher.SQLException e) {
            e.printStackTrace();
        }
    }

    /***
     * Check if the database is exist on device or not
     * This method will throw an error when it does not get any database.
     *
     * @return
     */
    private boolean checkDataBase() {
        net.sqlcipher.database.SQLiteDatabase tempDB = null;
        try {
            String myPath = DB_PATH + DB_NAME;
            tempDB = net.sqlcipher.database.SQLiteDatabase.openDatabase(myPath, KEY, null, net.sqlcipher.database.SQLiteDatabase.OPEN_READWRITE);
        } catch (net.sqlcipher.database.SQLiteException e) {
            Log.d("checkDataBase", e.getMessage());
        }
        if (tempDB != null)
            tempDB.close();
        return tempDB != null ? true : false;
    }


    /***
     * Copy database from source code assets to device
     *
     * @throws IOException
     */
    public void copyDataBase() throws IOException {
        try {
            InputStream myInput = context.getAssets().open(DB_NAME);
            String outputFileName = DB_PATH + DB_NAME;
            OutputStream myOutput = new FileOutputStream(outputFileName);

            byte[] buffer = new byte[1024];
            int length;

            while ((length = myInput.read(buffer)) > 0) {
                myOutput.write(buffer, 0, length);
            }

            myOutput.flush();
            myOutput.close();
            myInput.close();
        } catch (Exception e) {
            Log.d("copyDatabase", e.getMessage());
        }

    }


    /***
     * Open database
     *
     * @throws SQLException
     */
    public void openDataBase() throws net.sqlcipher.SQLException {
        String myPath = DB_PATH + DB_NAME;
        myDB = net.sqlcipher.database.SQLiteDatabase.openDatabase(myPath, KEY, null, net.sqlcipher.database.SQLiteDatabase.OPEN_READWRITE);
    }


    public SQLiteDatabase getMYDB() {
        return myDB;
    }

    private void encryptDB() throws IOException {
        String myPath = DB_PATH + DB_NAME;
        File originalFile = context.getDatabasePath(myPath);

        File newFile = File.createTempFile("sqlcipherutils", "tmp", context.getCacheDir());

        //As this was for default db (without encryption)!
        net.sqlcipher.database.SQLiteDatabase existing_db = net.sqlcipher.database.SQLiteDatabase.openDatabase(myPath, "", null, net.sqlcipher.database.SQLiteDatabase.OPEN_READWRITE);

        //And now we are using already encrypted DB!
        //KEY
        //net.sqlcipher.database.SQLiteDatabase existing_db = net.sqlcipher.database.SQLiteDatabase.openDatabase(myPath, KEY, null, net.sqlcipher.database.SQLiteDatabase.OPEN_READWRITE);
        String newPath = newFile.getPath();
        existing_db.rawExecSQL("ATTACH DATABASE '" + newPath + "' AS encrypted KEY '" + KEY + "';");
        existing_db.rawExecSQL("SELECT sqlcipher_export('encrypted');");
        existing_db.rawExecSQL("DETACH DATABASE encrypted;");

        existing_db.close();
        //Deleting original plain text db!
        originalFile.delete();
        //Renaming the new db same as old db!
        newFile.renameTo(originalFile);

    }


    @Override
    public synchronized void close() {
        if (myDB != null) {
            myDB.close();
        }
        super.close();
    }

}


build.gradle (Module:app)

apply plugin: 'com.android.application'

android {
    compileSdkVersion 25
    buildToolsVersion "25.0.1"
    defaultConfig {
        applicationId "com.example.sqlcipherjniexistsdb"
        minSdkVersion 15
        targetSdkVersion 25
        versionCode 1
        versionName "1.0"
        testInstrumentationRunner "android.support.test.runner.AndroidJUnitRunner"
        externalNativeBuild {
            cmake {
                cppFlags ""
            }
        }

        ndk {
            abiFilters 'x86', 'armeabi', 'armeabi-v7a'
        }

    }
    buildTypes {
        release {
            minifyEnabled false
            proguardFiles getDefaultProguardFile('proguard-android.txt'), 'proguard-rules.pro'
            buildConfigField "String", "DB_PATH", "\"/data/data/com.example.sqlcipherjniexistsdb/databases/\""
        }
        debug{
            buildConfigField "String", "DB_PATH", "\"/data/data/com.example.sqlcipherjniexistsdb/databases/\""
        }
    }
    externalNativeBuild {
        cmake {
            path "CMakeLists.txt"
        }
    }

    //Its for data binding.
    dataBinding {
        enabled = true
    }

}

dependencies {
    compile fileTree(dir: 'libs', include: ['*.jar'])
    androidTestCompile('com.android.support.test.espresso:espresso-core:2.2.2', {
        exclude group: 'com.android.support', module: 'support-annotations'
    })
    compile 'com.android.support:appcompat-v7:25.3.1'
    compile 'com.android.support.constraint:constraint-layout:1.0.2'
    compile 'net.zetetic:android-database-sqlcipher:3.5.4'
    testCompile 'junit:junit:4.12'
}


And its finally working !

exists_db_example_working.png


Now if user extracts DB also from App, then also he will get encrypted database.
As we have deleted the original (not encrypted) database from device and replaced it by encrypted one.

exists_db_database_extract.png


exists_db_not_open.png


Please find its working example at my github account :
SqlCipher with JNI for Existing DB
Kindly let me know for any concern.

Links :
1) https://github.com/sqlcipher/android-database-sqlcipher
2) https://www.zetetic.net/sqlcipher/sqlcipher-for-android/
3) http://lomza.totem-soft.com/tutorial-add-sqlcipher-to-your-android-app/
4) https://discuss.zetetic.net/t/sqlcipher-for-android-native-library-support/1440
5) https://developer.android.com/studio/projects/add-native-code.html

Data Binding (MVVM) I/O 2016

Hello Guys,
I am gonna tell you about few things of data binding. These are :

1) What is data binding ?
2) Why Should We use it ?
3) How to use it ? (And about MVVM).
4) Event Handling.
5) How Data Binding works (Behind the Scene) ?
6) Two Way Data Binding.
7) Binding with Recyclerview.
8) Data Binding Example.
9) Custom Binders.
10) Advantages and Disadvantages of Data Binding.
11) References.

So here we begin,

1) What is Data Binding :

Data binding is the process that establishes a connection between the application UI and business logic. If the binding has the correct settings and the data provides the proper notifications, then, when the data changes its value, the elements that are bound to the data reflect changes automatically.
Data binding can also mean that if an outer representation of the data in an element changes, then the underlying data can be automatically updated to reflect the change.
For example, if the user edits the value in a TextBox element, the underlying data value is automatically updated to reflect that change.

2) Why Should We Use It :

  1. Easy to handle and code.
  2. Removal of unnecessary relevant code (like Expression chaining).
  3. Removal finding viewById and setting listeners.
  4. And the most powerful feature Two-way data binding.
  5. Handling of Null Pointer Exception.


3) How to use It :

We will be using in MVVM (Model-View-ViewModel) pattern. As its been recommended by Google Android Team, to use each layer separately, so that our business logic does not get involved with our view.

For example, like to fetch contacts in Activity we make use of Cursor Loader in Activity/Fragment. But what if we have to test the logic part of cursor loader separately.
So for this purpose we then have to temporarily comment or remove extra code and then run test cases.

So in all, it becomes quite messy and unwanted work load.
Therefore, we should keep maintaining business logic and view layer completely different, also to interact in between these two layers we should use ViewModel layer.

Requirement :
1) Android 2.1
2) Android Plugin for Gradle 1.5.0-alpha1 or higher.


In project gradle :

android {

….

dataBinding{

enabled = true

}

}


Starting with first layout file :

Just keep :
<layout> as your root view and with sub tags <data></data> and any viewgroup.
Please make sure it will not work with <merge> tags. We have to specify at least one viewgroup.

Example :
<layout xmlns:android=”http…”>
<data>
<variable name=”user” type=”com.example…User/>
</data>
<LinearLayout
width=”match_parent”
height=”match_parent”>

<Textview width=”wrap_content”
height=”wrap_content”
text=”@{user.firstName}”/>

<Textview width=”wrap_content”
height=”wrap_content”
text=”@{user.lastName}”/>
</LinearLayout>
</layout>

Please Note : @{} denotes data bound value, which is going to get bind with object.


User Object (Model, This will be part of Model layer) 

public class User{
public final String firstName;
public final String lastName;

public User(String firstName, String lastName){
this.firstName = firstName;
this.lastName = lastName;
}

}

Now when we called text=”@{user.firstName}”, it will generate getter for this variable at compile time only and set its value.


MainActivity (View layer) :

public void onCreate(Bundle savedInstance){
super.onCreate(savedInstance);
MainActivityBinding binding = DataBindingUtil.setContentView(this,R.layout.main_activity);
User user = new User(“Test”,”User”);
binding.setUser(user);
}


Now here, DataBindingUtil is default class from Android.
MainActivityBinding is created automatically when we create layout file with <layout> as root tag.
It can be used to bind the Object and to get any variable (if required).
binding.setUser(user), it binds the object values (the variable which we mentioned in xml layout file).
Its much important as without it, the xml will not get values.


Please Note :  If the user object is null or any of its value is null then also data binding will handle it without app getting crash.
binding.setUser(null) -> it will still work.


4) Event Handling :

Event Handling is setting click events on view components.
It can be done in two ways :

1) Method Reference:
The expression is processed at compile time. Data binding wraps a listener on the target view.
It can be any onClick, onLongClick or any other custom attribute also.
Example : android:onClick=”@{variable.onButtonClick}”
Or if it’s in same activity then android:onClick=”onButtonClick”


2) Listener Binding:
It is used with lambda expression.This expression is evaluated when actual event happens.
Like if based on certain object value you have show/hide values or make it of different color then you must use this handling. Also it’s used to pass parameters for any methods also.
Example : android:onClick=”@{() -> variable.onButtonClick()}”
android:onClick=”@{(v) -> v.isVisible() ? doSomething() : void}”


5) Now what actually happens behind the scene :

1) Application begins with compilation.

2) First it process layout files, (over here whatever data binding expressions are written it gets deleted) and passed for further implementation.

3) Now these expressions are parsed first, means the syntax of data binding you have specified. If it’s wrong it will through you the error else it will continue with next step.

4) Now it comes to java code, the part of code which we used in our expressions. (like user.isFriend). And check whether it’s grammatically correct or wrong.

5) Now its corresponding setter/getter is called (like user.name, etc).

6) Two way data binding :

Data Binding is not only up to binding of data with UI, but also to update UI values when object value changes.
Here comes the actual/real power of data binding that is Two-Way Data Binding.
It can be used by giving your data objects the ability to notify when data changes.

We can implement Two way binding by using the following three ways :

1) Observable Object.

For this we have to extend BaseObservable class and call notifyPropertyChanged(BR.variableName) in setter of variable. Also we have to use annotation @Bindable in getters.
BR is also a class file like ‘R’, which is having ids of all variables.

2) Observable Fields.

The above method is bit time consuming. So we can use in this way also:
ObservableField<String> firstName = new ObservableField<String>();
user.firstName.set(“Sunny”);
It will change the object value and UI also.

3) Observable Collections.
This is must to use if we are using data binding on Recylerview or listview as our views get reused, so we cannot use simple array list, map, etc.


7) Binding with Recyclerview :

Data Binding has really reduced our efforts, just check it out (Adapter) :

With Data Binding :
public static class BindingHolder extends RecyclerView.ViewHolder {

    private ViewDataBinding binding;
     public BindingHolder(View rowView) {
super(rowView);
 binding = DataBindingUtil.bind(rowView);
     }
   public ViewDataBinding getBinding() {
 return binding;
     }
}

Without Data Binding :

public static class ViewHolder extends RecyclerView.ViewHolder {
  private TextView title, author, publisher;
    private ImageView thumbnail;
       public ViewHolder(View v) {
         super(v);
         title = (TextView) v.findViewById(R.id.book_title_textview);
          author = (TextView) v.findViewById(R.id.book_authors_textview);
          publisher = (TextView) v.findViewById(R.id.book_publisher_textview);
          thumbnail = (ImageView) v.findViewById(R.id.book_thumbnail_imageview);
     }
  }


With Data Binding :

@Override
  public void onBindViewHolder(BindingHolder holder, int position) {
     final Book book = mBooks.get(position);
     holder.getBinding().setVariable(BR.book, book);
   //To make happen binding immediately! (At times binding get scheduled, so to make it         happen forcefully and immediately)
     holder.getBinding().executePendingBindings();
  }

Without Data Binding :

@Override
  public void onBindViewHolder(ViewHolder holder, int position) {
     final Book book = mBooks.get(position);
     holder.author.setText(book.author);
     holder.title.setText(book.title);
     holder.publisher.setText(book.publisher);
}

@Override
  public BindingHolder onCreateViewHolder(ViewGroup parent, int type) {
     View v = LayoutInflater.from(parent.getContext())  .inflate(R.layout.row_search_result, parent, false);
     BindingHolder holder = new BindingHolder(v);
     return holder;
  }


8) Example :
Whatever we have seen, please find its working example of Data Binding with Activity and Fragment (with recyclerview, click events both method reference and listener binding, data passing via methods, custom font, etc.) at following location :

https://github.com/Sunny1989/DataBindingExample

Please download and run in Android Studio.


9) Custom Binders :

It can be used to bind :
 1) Custom Fonts.
 2) View Layout.
 3) Vector Drawables.

For Custom font we have used in current example, I will post another example with vector drawables also soon.

10) Pros and Cons with Data Binding :

Pros :
1) Although it makes Activities and Fragment light.
2) Also we can unit test view-model (business logic) without view bind to it. (MVVM)

But still few difficulties persists (Cons):
1) No proper/ specific error reporting for data binding.
2) Not much blogs maintained yet. (2015 blogs are outdated, just for understanding).


11) References :

  1. https://developer.android.com/topic/libraries/data-binding/index.html
  2. http://mutualmobile.com/posts/using-data-binding-api-in-recyclerview
  3. https://labs.ribot.co.uk/approaching-android-with-mvvm-8ceec02d5442#.ghtzbdgo5
  4. https://github.com/radzio/android-data-binding-recyclerview (this example is having multiple views for same recylerview).
  5. https://realm.io/news/data-binding-android-boyar-mount/
  6. And please do watch Google I/O 16 for Data Binding.

    Also I have personally taken help from George Mount to reach up to this level.

    https://plus.google.com/+GeorgeMount007

    You can refer to his blogs also (Half thought).

Thanks for reading it out, please do let me know if I can be helpful for you.

PlaceAutoCompleteFragment with custom UI

Hello Guys,

I have used PlaceAutocomplete the updated one (fragment), earlier it was a normal textview provided by android but now Android has changed it to fragment and we have to integrate fragment in our xml layout file.

For this we require few things :

1) Getting SHA-1 fingerprint of keystore.

2) Using Project name and SHA-1, Get an API key from Google Console and integrate in project.

3) Including latest google play services gradle (8.4.0)
1) Getting SHA-1 fingerprint of keystore (Android Debug Key):

i) Launch Android studio.
ii) Select project in “Project” mode.
iii) Select “Gradle” tab, at right hand side.
iv) Explore it -> Project Name -> Tasks -> android -> signingReport.
v) At console (run) you will get both MD5 and SHA1 .

2) Getting API Key from Google Console :

i)Go to the Google Developers Console.
ii)Select a project, or create a new one.
iii)Click Continue to enable the Google Places API for Android.
iv)On the Credentials page, create an Android key and set the API credentials.
Note: If you have an existing Android key, you may use that key.
V)In the create key dialog, restrict usage to your Android apps—enter your app’s SHA-1 fingerprint and package name.  (which we created above).
vi) Click Create , now you can find API key and we can use it by integrating in Android Manifest of our project.

<application>
  ...
  <meta-data
      android:name="com.google.android.geo.API_KEY"
      android:value="YOUR_API_KEY"/>
</application>

In Application tag in manifest.

3) Including latest google play services gradle (8.4.0): 

compile 'com.google.android.gms:play-services-location:8.4.0'

just add this in build.gradle of project.


Now create Activity and include this in its layout. Note that the name attribute is having path of our custom AutoPlaceComplete class.

<fragment
    android:id="@+id/autocomplete_fragment"
    android:name="com.example.CustomPlaceAutoCompleteFragment"
    android:layout_width="match_parent"
    android:layout_height="wrap_content" />


Over here we have made our own custom place auto-complete by extending the PlaceAutoCompleteFragment, so that we can provide our own UI for AutoComplete.
CustomPlaceAutoCompleteFragment :


import android.content.Intent;
import android.os.Bundle;
import android.support.annotation.Nullable;
import android.util.Log;
import android.view.LayoutInflater;
import android.view.View;
import android.view.ViewGroup;
import android.widget.EditText;

import com.google.android.gms.common.GoogleApiAvailability;
import com.google.android.gms.common.GooglePlayServicesNotAvailableException;
import com.google.android.gms.common.GooglePlayServicesRepairableException;
import com.google.android.gms.common.api.Status;
import com.google.android.gms.location.places.AutocompleteFilter;
import com.google.android.gms.location.places.Place;
import com.google.android.gms.location.places.ui.PlaceAutocomplete;
import com.google.android.gms.location.places.ui.PlaceAutocompleteFragment;
import com.google.android.gms.location.places.ui.PlaceSelectionListener;
import com.google.android.gms.maps.model.LatLngBounds;
import com.example.R;

/**
 * Created by sunny on 22/12/15.
 */
public class CustomPlaceAutoCompleteFragment extends PlaceAutocompleteFragment {

    private EditText editSearch;

    private View zzaRh;
    private View zzaRi;
    private EditText zzaRj;
    @Nullable
    private LatLngBounds zzaRk;
    @Nullable
    private AutocompleteFilter zzaRl;
    @Nullable
    private PlaceSelectionListener zzaRm;

    public CustomPlaceAutoCompleteFragment() {
    }

    @Override
    public View onCreateView(LayoutInflater inflater, ViewGroup container, Bundle savedInstanceState) {
        View var4 = inflater.inflate(R.layout.layout_place_autocomplete, container, false);

        editSearch = (EditText) var4.findViewById(R.id.editWorkLocation);
        editSearch.setOnClickListener(new View.OnClickListener() {
            @Override
            public void onClick(View v) {
                zzzG();
            }
        });

        return var4;
    }


    public void onDestroyView() {
        this.zzaRh = null;
        this.zzaRi = null;
        this.editSearch = null;
        super.onDestroyView();
    }

    public void setBoundsBias(@Nullable LatLngBounds bounds) {
        this.zzaRk = bounds;
    }

    public void setFilter(@Nullable AutocompleteFilter filter) {
        this.zzaRl = filter;
    }

    public void setText(CharSequence text) {
        this.editSearch.setText(text);
        //this.zzzF();
    }

    public void setHint(CharSequence hint) {
        this.editSearch.setHint(hint);
        this.zzaRh.setContentDescription(hint);
    }

    public void setOnPlaceSelectedListener(PlaceSelectionListener listener) {
        this.zzaRm = listener;
    }

    private void zzzF() {
        boolean var1 = !this.editSearch.getText().toString().isEmpty();
        //this.zzaRi.setVisibility(var1?0:8);
    }

    private void zzzG() {
        int var1 = -1;

        try {
            Intent var2 = (new PlaceAutocomplete.IntentBuilder(2)).setBoundsBias(this.zzaRk).setFilter(this.zzaRl).zzeq(this.editSearch.getText().toString()).zzig(1).build(this.getActivity());
            this.startActivityForResult(var2, 1);
        } catch (GooglePlayServicesRepairableException var3) {
            var1 = var3.getConnectionStatusCode();
            Log.e("Places", "Could not open autocomplete activity", var3);
        } catch (GooglePlayServicesNotAvailableException var4) {
            var1 = var4.errorCode;
            Log.e("Places", "Could not open autocomplete activity", var4);
        }

        if (var1 != -1) {
            GoogleApiAvailability var5 = GoogleApiAvailability.getInstance();
            var5.showErrorDialogFragment(this.getActivity(), var1, 2);
        }

    }

    public void onActivityResult(int requestCode, int resultCode, Intent data) {
        if (requestCode == 1) {
            if (resultCode == -1) {
                Place var4 = PlaceAutocomplete.getPlace(this.getActivity(), data);
                if (this.zzaRm != null) {
                    this.zzaRm.onPlaceSelected(var4);
                }

                this.setText(var4.getName().toString());
            } else if (resultCode == 2) {
                Status var5 = PlaceAutocomplete.getStatus(this.getActivity(), data);
                if (this.zzaRm != null) {
                    this.zzaRm.onError(var5);
                }
            }
        }

        super.onActivityResult(requestCode, resultCode, data);
    }

}


As we have used custom view so we are require to provide our own layout.
In our layout I have taken EditText and one location pin image at its right side.

<?xml version="1.0" encoding="utf-8"?>
<LinearLayout xmlns:android="http://schemas.android.com/apk/res/android"
    android:layout_width="match_parent"
    android:layout_height="match_parent"
    android:orientation="vertical">


    <EditText
        android:id="@+id/editWorkLocation"
        android:layout_width="match_parent"
        android:layout_height="wrap_content"
        android:drawableRight="@drawable/ic_pin_blue" //Pin image
        android:editable="false"
        android:hint="@string/work_business_location"
        android:singleLine="true"
        android:textColor="@color/black"
        android:textSize="@dimen/txt_14sp" />

</LinearLayout>


As its been included in xml (layout), now we can call it from code side.
Write the below code in onCreate or onCreateView (if fragment is used) :


// Retrieve the PlaceAutocompleteFragment.
PlaceAutocompleteFragment autocompleteFragment = (PlaceAutocompleteFragment)
        getActivity().getFragmentManager().findFragmentById(R.id.autocomplete_fragment);

// Register a listener to receive callbacks when a place has been selected or an error has
// occurred.
autocompleteFragment.setOnPlaceSelectedListener(new PlaceSelectionListener() {
    @Override
    public void onPlaceSelected(Place place) {
        // TODO: Get info about the selected place.
        Log.i(TAG, "Place: " + place.getName());
Log.i(TAG, "Place Selected: " + place.getName() + "  " + place.getLatLng());

        double workLatitude = place.getLatLng().latitude;
        double workLongitude = place.getLatLng().longitude;

      //Over we can get the address, rating, price level,etc.

    }

    @Override
    public void onError(Status status) {
        // TODO: Handle the error.
        Log.i(TAG, "An error occurred: " + status);
    }
  });


Or implement PlaceSelectionListener in your Activity or fragment.

Now you can finally execute the project and on click of EditText, fragment will get open and you can get locations based on your typed string.
Also do not try to remove Google keyword from fragment (which gets open), as its been mandatory to show  “Powered by Google ” text in PlaceAutoComplete.

Check other blogs like Volley PART I, Image uploading and downloading using volley (in coming blog), etc.

Volley PART I

Hello Guys,
I have been working on different projects and got a very nice experience of using volley.
Although Retrofit is also much efficient, but as Volley provides Caching, Cancelling of request, Cancel of  multiple image request if view or UI is not available and which actually fascinates me to use Volley.

And in this blog I am going to share my code for hitting JSON request (JSON object and JSON array both),String response request, Image upload, Image download, Use of Network Image View which is also much efficient (provided by volley only) and also to have Rounded Network Image View which I have used in few screens.
And for all this I have made base (custom) classes, so that anyone can easily use it and directly integrate in their project.
Now first of all to use Volley, you need to add Volley dependency in build.gradle.

Starting from basic :

1) Make one Project, Goto File -> New Project.

2) Then go in Project Folder -> app -> build.gradle.
Add 
compile ‘com.mcxiaoke.volley:library-aar:1.0.0’ in dependencies {}.

3) Now we are creating a base class for creating volley request object.
We are making this a singleton class, as we require only a single object for requesting throughout application.
Also we are creating object “Image Loader” which is responsible of downloading images, which we are going to use further in our example.
Image Loader uses LRUCache.
And another object of “Request Queue”, which will keep all request in queue and call it based on Priority.

import android.content.Context;
import android.graphics.Bitmap;
import android.support.v4.util.LruCache;
import android.text.TextUtils;

import com.android.volley.Cache;
import com.android.volley.Network;
import com.android.volley.Request;
import com.android.volley.RequestQueue;
import com.android.volley.toolbox.BasicNetwork;
import com.android.volley.toolbox.DiskBasedCache;
import com.android.volley.toolbox.HurlStack;
import com.android.volley.toolbox.ImageLoader;

/**
 * Created by sunny on 8/12/15.
 */
public class MyVolley {

    private static MyVolley mInstance;
    private RequestQueue mRequestQueue;
    private ImageLoader mImageLoader;
    private static Context mCtx;
    public static final String TAG = MyVolley.class.getSimpleName();

    private MyVolley(Context context) {
        mCtx = context;
        mRequestQueue = getRequestQueue();

        mImageLoader = new ImageLoader(mRequestQueue,
                new ImageLoader.ImageCache() {
                    private final LruCache<String, Bitmap>
                            cache = new LruCache<String, Bitmap>(20);

                    @Override
                    public Bitmap getBitmap(String url) {
                        return cache.get(url);
                    }

                    @Override
                    public void putBitmap(String url, Bitmap bitmap) {
                        cache.put(url, bitmap);
                    }
                });

        //Added to make image upload and download faster!
        //mImageLoader.setBatchedResponseDelay(0);
    }

    public static synchronized MyVolley getInstance(Context context) {
        if (mInstance == null) {
            mInstance = new MyVolley(context);
        }
        return mInstance;
    }

    public RequestQueue getRequestQueue() {
        if (mRequestQueue == null) {
            // getApplicationContext() is key, it keeps you from leaking the
            // Activity or BroadcastReceiver if someone passes one in.
            Cache cache = new DiskBasedCache(mCtx.getCacheDir(), 10 * 1024 * 1024);
            Network network = new BasicNetwork(new HurlStack());

// We can give Thread Pool Size
 mRequestQueue = new RequestQueue(cache, network,10);

 // Don't forget to start the volley request queue
 mRequestQueue.start();
 //mRequestQueue = Volley.newRequestQueue(mCtx.getApplicationContext());
 }
 return mRequestQueue;
 }

 public <T> void addToRequestQueue(Request<T> req) {
 getRequestQueue().add(req);
 }

 public <T> void addToRequestQueue(Request<T> req, String tag) {
 // set the default tag if tag is empty
 req.setTag(TextUtils.isEmpty(tag) ? TAG : tag);
 getRequestQueue().add(req);
 }

 public ImageLoader getImageLoader() {
 return mImageLoader;
 }


}

Now we are creating one generic class for JSON requests (JSON array and JSON object both), please note that I have used GSON for parsing json object.
So first add latest version of Gson in build.gradle.

compile 'com.google.code.gson:gson:2.5'

GSONRequest Class :

import android.app.ProgressDialog;
import android.content.Context;

import com.android.volley.AuthFailureError;
import com.android.volley.DefaultRetryPolicy;
import com.android.volley.NetworkResponse;
import com.android.volley.ParseError;
import com.android.volley.Request;
import com.android.volley.Response;
import com.android.volley.toolbox.HttpHeaderParser;
import com.google.gson.Gson;
import com.google.gson.JsonSyntaxException;
import com.example.utility.dialog.ProgressBarDialog;
import com.example.utility.logs.Logcat;

import java.io.IOException;
import java.io.UnsupportedEncodingException;
import java.util.Map;

/**
 * Created by sunny on 8/12/15.
 */
public class GsonRequest<T> extends Request<T> {
    private final Gson gson = new Gson();
    private final Class<T> clazz;
    private Map<String, String> headers;
    private final Response.Listener<T> listener;
    private final Context ctxt;
    private final Map<String, String> params;
    public static final String TAG = GsonRequest.class.getSimpleName();

    //Adding CustomErrorListener, so that we will not be required to mention in all activities!
    private CustomErrorListener customErrorListener;
    private ProgressBarDialog progressBarDialog;

    private ProgressDialog progressDialog;

    /**
     * Make a GET request and return a parsed object from JSON.
     *
     * @param url     URL of the request to make
     * @param clazz   Relevant class object, for Gson's reflection
     * @param headers Map of request headers
     */
    public GsonRequest(String url, Class<T> clazz, Map<String, String> headers,
                       Response.Listener<T> listener, Response.ErrorListener errorListener, Map<String, String> params, Context ctxt, int methodType, boolean showDialog) {
        super(methodType, url, errorListener);
        setRetryPolicy(new DefaultRetryPolicy(VolleyUtils.DEFAULT_TIMEOUT_MS,
                VolleyUtils.DEFAULT_MAX_RETRIES, DefaultRetryPolicy.DEFAULT_BACKOFF_MULT));

        this.clazz = clazz;
        this.headers = headers;
        this.listener = listener;
        this.params = params;
        this.ctxt = ctxt;
        customErrorListener = (CustomErrorListener) errorListener;


        if (showDialog == true) {
            showProgressDialog();
        }

    }

      public void showProgressBarDialog() {
        if (progressBarDialog == null) {
            progressBarDialog = ProgressBarDialog.getInstance(ctxt);

            if (null != customErrorListener) {
                //customErrorListener.setProgressBarDialog(progressBarDialog);
            }
        }
        progressBarDialog.showProgressDialog();
    }


    public void closeProgressDialog() {
        if (null != progressBarDialog && progressBarDialog.isShowing()) {
            progressBarDialog.dismissDialog();
        }
    }

    @Override
    public Map<String, String> getHeaders() throws AuthFailureError {
        if (headers != null) {
            return headers;
        } else {
            headers = VolleyGlobal.getInstance(ctxt).getHeaders();
            Logcat.showLog(TAG, headers.values().toString());
            return headers;
        }

    }


    @Override
    protected Map<String, String> getParams() throws AuthFailureError {
        return params;
    }


    @Override
    protected void deliverResponse(T response) {
        listener.onResponse(response);
        //closeProgressDialog();
        dismissProgressDialog();
    }

    @Override
    protected Response<T> parseNetworkResponse(NetworkResponse response) {
        try {
            String json = new String(response.data, HttpHeaderParser.parseCharset(response.headers));
            Logcat.showLog(TAG, json);
            T myPojo = gson.fromJson(json, clazz);
            return Response.success(myPojo, HttpHeaderParser.parseCacheHeaders(response));
        } catch (UnsupportedEncodingException e) {
            return Response.error(new ParseError(e));
        } catch (JsonSyntaxException e) {
            return Response.error(new ParseError(e));
        } catch (IOException e) {
            return Response.error(new ParseError(e));
        } catch (Exception e) {
            return Response.error(new ParseError(e));
        }
    }


    public void showProgressDialog() {
        progressDialog = ProgressDialog.show(ctxt, "Please wait", "Processing...", true, false);
        customErrorListener.setProgressBarDialog(progressDialog);
    }

    public void dismissProgressDialog() {
        if (null != progressDialog) {
            progressDialog.dismiss();
        }
    }

}


In the above class we have used constructor to pass data and initialize object, also we have have used boolean to show dialog or not.

VolleyGlobal Class :

import android.content.Context;

import com.android.volley.AuthFailureError;
import com.example.utility.Constants;

import java.util.HashMap;
import java.util.Map;

/**
 * Created by sunny on 8/12/15.
 */
public class VolleyGlobal {

    private static VolleyGlobal mInstance;
    private static Context mCtx;
    public static final String TAG = VolleyGlobal.class.getSimpleName();
    private static HashMap<String, String> headers = new HashMap<String, String>();

    private VolleyGlobal(Context context) {
        mCtx = context;
    }


    public static synchronized VolleyGlobal getInstance(Context context) {
        if (mInstance == null) {
            mInstance = new VolleyGlobal(context);
        }
        return mInstance;
    }

    public Map<String, String> getHeaders() throws AuthFailureError {
        //headers.put("Content-Type", "application/json");
        return headers;
    }

  }


This class will keep header parameters if required (like access token, api key or user id, etc.) any for your application.


I) Example of simple JSON request :

Now we will create one UI for hitting the simple JSON request. I have made one screen for changing password, which will hit a background call. This screen consists of 3 edittext that is, old password, new password and confirm password, and one save button.

import android.app.ProgressDialog;
import android.os.Bundle;
import android.support.v7.widget.Toolbar;
import android.text.TextUtils;
import android.view.View;
import android.widget.EditText;
import android.widget.TextView;

import com.android.volley.Request;
import com.android.volley.Response;
import com.example.R;
import com.example.custom.activities.BaseAppCompactActivity;
import com.example.pojo.login.BasicPojo;
import com.example.utility.Constants;
import com.example.utility.Utils;
import com.example.volley.CustomErrorListener;
import com.example.volley.GsonRequest;
import com.example.volley.MyVolley;

import java.util.HashMap;
import java.util.Map;

/**
 * Created by sunny on 3/12/15.
 */
public class ChangePwdActivity extends BaseAppCompactActivity implements View.OnClickListener, Response.Listener {

    private Toolbar toolbar;
    private TextView txtSave;
    private EditText editOldPwd, editNewPwd, editConfirmPwd;

    @Override
    protected void onCreate(Bundle savedInstanceState) {
        super.onCreate(savedInstanceState);
        setContentView(R.layout.activity_change_password);
        toolbar = (Toolbar) findViewById(R.id.toolbar);

        toolbar.setTitle(R.string.change_password);

        toolbar.setNavigationIcon(R.drawable.header_icon_back);
        toolbar.setNavigationOnClickListener(new View.OnClickListener() {
            @Override
            public void onClick(View v) {
                finish();
            }
        });

        txtSave = (TextView) findViewById(R.id.txtSave);
        txtSave.setOnClickListener(this);

        editOldPwd = (EditText) findViewById(R.id.editOldPwd);
        editNewPwd = (EditText) findViewById(R.id.editNewPwd);
        editConfirmPwd = (EditText) findViewById(R.id.editConfirmPwd);

    }

    @Override
    public void onClick(View v) {
        if (v.getId() == R.id.txtSave) {
            callChangePwdReq();
        }
    }

    public boolean validateFields() {
        String pwd = new String(editNewPwd.getText().toString().trim());
        String confPwd = new String(editConfirmPwd.getText().toString().trim());
        if (TextUtils.isEmpty(pwd)) {
            Utils.makeShortToast(this, getString(R.string.please_enter_pwd));
            return false;
        } else if (TextUtils.isEmpty(confPwd)) {
            Utils.makeShortToast(this, getString(R.string.please_enter_confirm_pwd));
            return false;
        } else if (pwd.length() < getResources().getInteger(R.integer.password_minimum_length)) {
            Utils.makeShortToast(this, getResources().getString(R.string.please_enter_pwd_six_characters));
            return false;
        } else if (!pwd.equals(confPwd)) {
            Utils.makeShortToast(this, getString(R.string.your_pwd_confpwd_not_match));
            return false;
        }
        return true;
    }


    public void callChangePwdReq() {
        if (validateFields()) {
            String url = Constants.SERVER_URL + "user/change_password";
            String tag_chng_pwd_req = "change_pwd";


            Map<String, String> params = new HashMap<String, String>();
            params.put("old_password", Utils.checkForNullValue(editOldPwd.getText().toString().trim()));
            params.put("new_password", Utils.checkForNullValue(editNewPwd.getText().toString().trim()));

            CustomErrorListener customErrorListener = new CustomErrorListener(ChangePasswordActivity.this);
            GsonRequest gsonRequest = new GsonRequest(url, BasicPojo.class, null, this, customErrorListener, params, this, Request.Method.POST, true);
           MyVolley.getInstance(getApplicationContext()).addToRequestQueue(gsonRequest, tag_chng_pwd_req);
        }
    }

    
    @Override
    public void onResponse(Object response) {
        if (response instanceof BasicPojo) {
            BasicPojo pwdPojo = (BasicPojo) response;
//If requests gets success!
            if (Integer.valueOf(pwdPojo.getSuccess()) == Constants.REQUEST_HIT_SUCCESS) {
                Utils.makeShortToast(this, pwdPojo.getMessage());
                finish();
            } else {
//Else if we get failure from server.
                Utils.makeShortToast(this, pwdPojo.getMessage());
            }
        }
    }
}

As volley has two listeners that is, ErrorListener and Response.Listener (for Success of request).

We have made our own custom error listener so that it can be used at multiple activities and also to handle multiple types of error at one place only.

CustomErrorListener:

import android.app.ProgressDialog;
import android.content.Context;
import android.content.Intent;
import com.android.volley.AuthFailureError;
import com.android.volley.NetworkError;
import com.android.volley.NoConnectionError;
import com.android.volley.ParseError;
import com.android.volley.ServerError;
import com.android.volley.TimeoutError;
import com.android.volley.VolleyError;
import com.android.volley.Response.ErrorListener;
import com.example.pojo.login.BasicPojo;
import com.example.utility.Utils;
import com.example.utility.logs.Logcat;
import com.example.volley.VolleyGlobal;

public class CustomErrorListener implements ErrorListener {
    private Context context;
    private ProgressDialog progressBarDialog;
    private final String TAG = CustomErrorListener.class.getSimpleName();

    public CustomErrorListener(Context context) {
        this.context = context;
    }

    public void setProgressBarDialog(ProgressDialog progressBarDialog) {
        this.progressBarDialog = progressBarDialog;
    }

    public void onErrorResponse(VolleyError error) {
        if(null != this.progressBarDialog && this.progressBarDialog.isShowing()) {
            this.progressBarDialog.dismiss();
        }

        if(null == error.getMessage()) {
            Logcat.showLog(this.TAG, error.getClass().toString());
        } else {
            Logcat.showLog(this.TAG, error.getMessage());
        }

        String errorText = null;
        if(error instanceof BasicPojo) {
            errorText = error.getMessage();
        } else if(error instanceof ServerError) {
            errorText = "ServerError";
        } else if(error instanceof AuthFailureError) {
            errorText = "AuthFailureError";
        } else if(error instanceof ParseError) {
            errorText = "ParseError";
        } else if(error instanceof NoConnectionError) {
            String msg = error.getCause().getMessage();
            if(msg.equalsIgnoreCase("No Authentication challenges found")) {
                errorText = this.context.getString(2131099844);
                this.callLoginScreen();
            } else {
                errorText = this.context.getString(2131099820);
            }
        } else if(error instanceof TimeoutError) {
            errorText = this.context.getString(2131099740);
        } else if(error instanceof NetworkError) {
            errorText = this.context.getResources().getString(2131099813);
        }

        if(null != errorText) {
            Utils.makeShortToast(this.context, errorText);
        } else {
            Utils.makeShortToast(this.context, this.context.getString(2131099813));
        }

    }

}

Basic Pojo (which consists of success flag and message), It can be different in your case :

import com.android.volley.VolleyError;

public class BasicPojo extends VolleyError {
    private String message;
    private String success;

    public BasicPojo() {
    }

    public String getMessage() {
        return this.message;
    }

    public void setMessage(String message) {
        this.message = message;
    }

    public String getSuccess() {
        return this.success;
    }

    public void setSuccess(String success) {
        this.success = success;
    }
}


Next part will consists of image uploading (with data and without data), with integrating image cropping library, and downloading of image. (Volley PART II)